
Are you ready to add a charming touch to your garden that both you and the birds will love? Making a concrete bird bath is easier than you might think, and it’s a project you can complete in a weekend.
Imagine watching colorful birds splash and play right in your backyard, all thanks to your own handiwork. In this guide, you’ll discover simple steps to create a sturdy, beautiful bird bath that lasts for years. Keep reading, and by the end, you’ll have everything you need to bring this delightful feature to life.

Credit: www.dukemanorfarm.com
Choosing The Right Materials
Choosing the right materials ensures your concrete bird bath lasts long and looks great. Quality materials make the project easier and more enjoyable. Focus on durable, weather-resistant, and safe supplies. This section guides you through selecting the best concrete mix, mold, and tools.
Selecting Concrete Mix
Pick a concrete mix designed for outdoor use. Choose a mix with a smooth finish for better appearance. Fast-setting mixes save time but require quick work. Consider mixes with waterproof additives to protect from rain and frost. Avoid mixes with large stones; they can create rough surfaces.
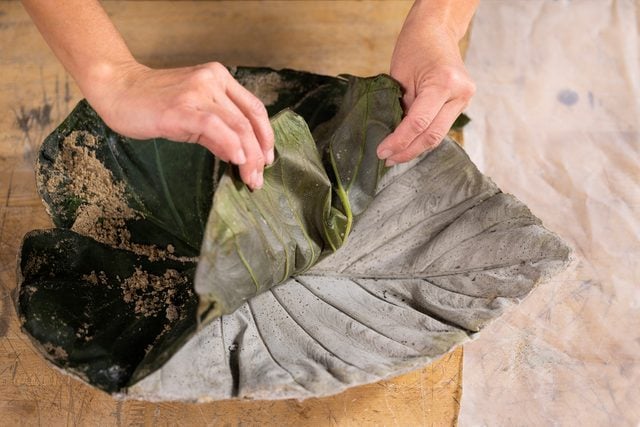
Picking A Mold
Select a mold that fits your desired bird bath shape and size. Plastic molds are lightweight and easy to use. Silicone molds offer fine detail and easy release. Household items like large bowls or cake pans can serve as molds. Ensure the mold is sturdy and can hold the concrete without bending.
Gathering Tools And Accessories
- Mixing bucket or wheelbarrow for concrete
- Trowel or spatula for smoothing surface
- Protective gloves to keep hands safe
- Plastic sheet or tarp to cover the bird bath while curing
- Release agent like cooking spray or oil for easy mold removal
- Measuring tools for accurate water and mix ratios
Preparing The Work Area
Preparing the work area is essential before making a concrete bird bath. A clean and organized space helps you work safely and efficiently. It reduces mistakes and keeps materials within reach.
Setting Up A Safe Workspace
Choose a flat, stable surface outside or in a well-ventilated area. Keep children and pets away from the work zone. Wear gloves and a mask to protect your skin and lungs from dust. Have water nearby for cleaning spills or rinsing tools. Make sure your workspace has good lighting to see details clearly.
Protecting Surfaces
Concrete can stain or damage surfaces. Cover tables or floors with plastic sheets or old newspapers. Use a tarp or drop cloth under your work area to catch drips. Secure coverings with tape or weights to stop slipping. Clean spills quickly to avoid permanent marks or damage.
Organizing Materials
Gather all materials before starting. Place concrete mix, water, molds, and tools within easy reach. Use containers to hold small items like stirring sticks or measuring cups. Keep a trash bin nearby for waste. Organizing materials saves time and keeps your work area tidy.
Mixing The Concrete
Mixing concrete correctly is key to a strong and durable bird bath. The right mix ensures the concrete sets well and holds its shape. Careful preparation leads to a smooth, easy-to-work-with material. Let’s explore how to measure ingredients, get the right consistency, and mix like a pro.
Measuring Ingredients
Use a simple ratio for a good concrete mix. A common mix is 1 part cement, 2 parts sand, and 3 parts gravel. Measure ingredients by volume, not weight. Use buckets or containers for accuracy. Precise measuring helps avoid weak or crumbly concrete.
Achieving The Right Consistency
The concrete should be thick but workable. Think of a thick cake batter texture. Add water slowly while mixing. Too much water weakens the concrete. Too little water makes it hard to spread. Test by scooping some mix on a trowel. It should hold its shape but be easy to smooth.
Tips For Mixing
- Mix dry ingredients first until evenly combined.
- Add water gradually, stirring continuously.
- Use a hoe, shovel, or a drill with a paddle attachment.
- Work in a clean mixing container or wheelbarrow.
- Avoid over-mixing, which can cause air bubbles.
- Mix only what you can use in 30 minutes.

Credit: www.youtube.com
Casting The Bird Bath
Casting the bird bath is a key part of this project. It shapes the final look and feel of your bird bath. This process involves pouring concrete into a mold and giving it a smooth, polished surface. You can also add unique touches to make your bird bath stand out.
Pouring Into The Mold
Start by mixing your concrete thoroughly. Make sure it is smooth and free of lumps. Pour the concrete slowly into the mold. Fill it evenly to avoid air bubbles. Tap the sides gently to help release trapped air. This ensures a solid, strong bird bath.
Smoothing The Surface
Use a trowel or a flat tool to smooth the top. Work carefully to remove any bumps or ridges. Smooth edges give the bird bath a neat, finished look. Let the surface set slightly before the final smoothing pass. This step makes the bird bath comfortable for birds to perch on.
Adding Decorative Details
Before the concrete fully hardens, add patterns or designs. Press leaves, shells, or small stones gently into the surface. You can carve simple shapes with a stick or tool. These details give your bird bath a personal touch. Make sure decorations are secure and won’t fall off.
Curing And Finishing
Curing and finishing are crucial for a strong and beautiful concrete bird bath. Proper curing ensures the concrete hardens well. Finishing gives your bird bath a smooth look and protects it from weather. This process takes patience but is worth the effort.
Allowing Proper Drying Time
Concrete needs time to dry and become strong. Leave the bird bath in a shaded area. Avoid direct sunlight or rain during curing. Keep the concrete moist by spraying water lightly. Do this for at least 3 to 7 days. This helps prevent cracks and weak spots.
Removing The Mold
Once dry, carefully remove the mold. Gently pull the mold away from the concrete. Use a soft brush to clean any rough edges. Sand the surface with fine sandpaper for smoothness. Take care not to damage the shape or details.
Sealing And Painting
Seal the concrete to protect it from water damage. Use a clear, waterproof sealer made for concrete. Apply with a brush or spray evenly across the surface. Let the sealer dry fully before use.
Painting adds color and style to your bird bath. Choose paint suitable for outdoor concrete. Use light, even coats and let each dry before adding more. This keeps the paint fresh and lasting longer.
Credit: www.familyhandyman.com
Placement And Maintenance
Choose a level spot for your concrete bird bath to ensure stability. Regularly clean and refill it with fresh water. Maintain its beauty by checking for cracks and fixing them promptly.
Creating a concrete bird bath is a rewarding project that enhances your garden’s appeal while providing a sanctuary for local birds. However, its beauty and functionality depend heavily on where you place it and how you maintain it over time. Think of placement and maintenance as the final touches that ensure your bird bath remains a delightful garden feature, season after season.Choosing The Perfect Spot
Finding the ideal location for your bird bath can make all the difference. Place it in a spot that gets partial sunlight and shade throughout the day. This keeps the water cool and prevents it from evaporating quickly. Consider the proximity to trees or shrubs. Birds feel safer when they have a quick escape to nearby cover. However, avoid placing it directly under trees to prevent debris from falling into the water. Position the bird bath at a visible spot from your window. This way, you can enjoy watching the birds without disturbing them.Cleaning Tips
Regular cleaning is crucial to keep the bird bath inviting and safe for birds. Use a mild soap solution and a brush to scrub away algae and dirt. Rinse thoroughly to ensure no soap residue remains. Do not use harsh chemicals or cleaners. They can harm the birds and damage the concrete. For stubborn stains, a mixture of vinegar and water can do the trick. Make cleaning a weekly routine. It not only keeps the bird bath looking good but also prevents the spread of diseases among birds.Seasonal Care
Each season brings its own set of challenges and opportunities for your bird bath. During summer, check the water levels daily due to evaporation. Refill as needed to keep the bath inviting. In winter, prevent water from freezing. Consider using a heater designed for bird baths or simply bringing the bath indoors if temperatures drop too low. Spring and fall are great times to inspect the bird bath for any cracks or damage. Repairing small issues promptly can save you from bigger headaches down the road. Is your bird bath ready for the changing seasons? With the right care, it will continue to be a cherished part of your garden for years to come.Frequently Asked Questions
How Long Does It Take To Make A Concrete Bird Bath?
Making a concrete bird bath typically takes 2 to 3 days. This includes mixing, molding, curing, and drying time for strength and durability.
What Materials Are Needed For A Concrete Bird Bath?
You need cement, sand, water, a mold, a mixing container, and sealant. Optionally, use pebbles or paint for decoration.
How Do I Prevent Cracks In A Concrete Bird Bath?
Mix concrete properly, avoid excess water, and cure it slowly. Seal the bird bath to protect against weather damage.
Can I Customize The Shape Of My Concrete Bird Bath?
Yes, use different molds or create your own shape. Concrete is versatile and allows for unique designs.
Conclusion
Creating a concrete bird bath adds beauty to any garden. It attracts birds and brings nature closer. The process is simple and uses basic materials. You can customize its shape and size easily. Regular care keeps it looking fresh and clean.
Enjoy watching birds visit your new bath daily. This project offers fun and a sense of pride. Try making one and see the joy it brings.


