
Are you looking to add a charming touch to your garden while attracting beautiful birds? Making your own concrete bird bath is easier than you think—and it’s a rewarding project you can finish in a weekend.
Imagine watching colorful birds splash and play in your very own handmade bath. In this guide, you’ll discover simple, step-by-step instructions that anyone can follow. By the end, you’ll have a sturdy, stylish bird bath that not only enhances your outdoor space but also invites nature right to your doorstep.
Ready to get started? Let’s dive in!

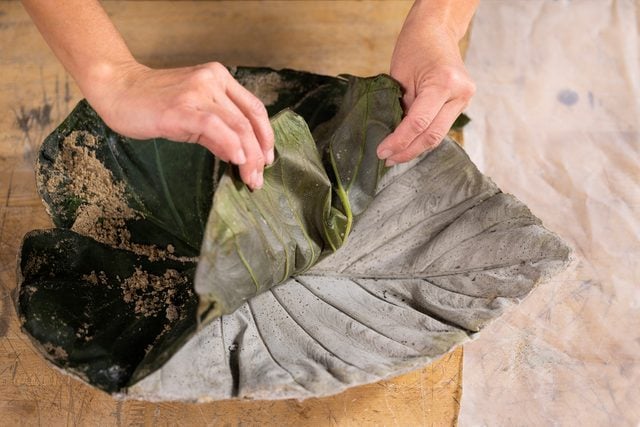
Credit: www.dukemanorfarm.com
Choosing Materials
Choosing the right materials is key to crafting a durable and attractive concrete bird bath. Your selections will affect not only the look but also how long your bird bath lasts outdoors. Taking time to pick quality supplies can save you from headaches later.
Selecting Concrete Mix
Look for a concrete mix specifically designed for outdoor use. These mixes often include additives that resist cracking and withstand weather changes.
You might want to consider a mix labeled as “high-strength” or one that includes polymer fibers for extra durability. Avoid standard concrete mixes meant for indoor projects, as they may crumble faster in outdoor conditions.
Have you checked the curing time on the package? Faster curing mixes let you finish your project sooner but require quicker work during pouring.
Picking A Mold
The mold shapes your bird bath, so choose one that matches your style and size needs. You can use plastic basins, silicone molds, or even repurpose household items like large bowls.
Think about the depth and width: a shallow, wide basin attracts more birds but holds less water, while a deeper mold keeps water cleaner longer.
Have you considered the ease of removing the concrete from the mold? Flexible molds make this step simpler and reduce the risk of breaking your creation.
Gathering Tools
Having the right tools on hand makes the process smoother and your results neater. Essential tools include a mixing bucket, trowel, gloves, and a level surface for curing.
Don’t forget safety gear like masks and eye protection when working with concrete dust. Small details like a spray bottle for misting can help control drying and prevent cracks.
Ask yourself: Do you have a sturdy workspace? A flat, stable area is critical for keeping your bird bath even as it sets.
Preparing The Mold
Preparing the mold is a key step in making a concrete bird bath. A clean and well-supported mold shapes the concrete perfectly. This part sets the foundation for a smooth, detailed finish. Careful preparation prevents sticking and damage during removal.
Cleaning And Oiling
Start by cleaning the mold thoroughly. Remove dust, dirt, or old concrete bits. Use warm water and a mild soap for best results. Let it dry completely before moving on.
Next, apply a thin layer of mold release oil. This stops the concrete from sticking. Use a soft cloth or brush to spread oil evenly. Cover every corner and surface inside the mold.
Setting Up Support
Support the mold firmly on a flat, stable surface. This keeps the mold steady during pouring. Use blocks or wooden planks to raise the mold if needed. Check that it does not wobble or tilt.
Secure the mold with clamps or weights if possible. This prevents movement while the concrete sets. Proper support helps achieve a smooth shape without cracks or shifts.
Mixing Concrete
Mixing concrete correctly is key to making a strong bird bath. The right mix ensures durability and a smooth finish. Too much water or dry mix can cause cracks or weak spots. Follow simple steps for a perfect blend.
Measuring Ingredients
Measure the ingredients carefully for a balanced mix. Use a ratio of 1 part cement, 2 parts sand, and 3 parts gravel. Add water slowly to reach a thick, creamy texture. Avoid adding too much water to keep strength.
- Use a bucket or container for accurate measuring.
- Keep the ratio consistent for every batch.
- Use clean water free from dirt or debris.
Mixing Techniques
Combine dry ingredients first in a wheelbarrow or mixing tray. Mix thoroughly to blend cement, sand, and gravel evenly. Slowly add water while stirring with a trowel or shovel. Mix until the concrete holds together but is not runny.
- Mix from the edges to the center for even texture.
- Check consistency by squeezing a handful; it should hold shape.
- Mix only what you can use within 30 minutes.
Pouring And Shaping
Pouring and shaping concrete is where your bird bath begins to take form. This stage demands patience and attention to detail to ensure a smooth and appealing finish. How you fill the mold and handle the surface will determine the durability and beauty of your bird bath.
Filling The Mold
Start by mixing your concrete to a thick, pancake-batter consistency—thick enough to hold shape but still pourable. Pour the mixture slowly into the mold, allowing it to fill every corner without trapping air bubbles.
Tap the sides gently or use a stick to poke around inside the mold. This releases trapped air and prevents weak spots. If you rush this, your bird bath might crack or crumble later.
Think about how the concrete settles. You want an even layer without gaps. It’s tempting to pour quickly, but slow and steady wins the race here.
Smoothing The Surface
Once the mold is filled, use a trowel or a flat piece of wood to smooth the top. Your goal is a clean, even surface, free of lumps or rough patches that could hurt birds or spoil the look.
Don’t press too hard, or you’ll push the concrete down unevenly. Instead, use gentle, sweeping strokes to level the surface. You can also add texture if you want a rustic look by lightly brushing the surface before it hardens.
Have you ever noticed how a smooth finish can make a simple project look professional? Take your time here—it’s worth the extra effort.
Curing Process
The curing process is a crucial step in making a concrete bird bath. It allows the concrete to harden properly and reach its full strength. Without proper curing, your bird bath could crack or weaken over time, reducing its durability and appearance.
Covering The Bird Bath
After pouring your concrete, you need to keep it moist by covering it. Use plastic sheets or wet burlap to trap moisture and prevent the surface from drying too fast. This helps the concrete cure evenly and avoid cracks.
I once skipped covering my bird bath, thinking it would dry faster in the sun. Instead, it developed small cracks that ruined the smooth finish. That experience taught me that covering your concrete is not optional but essential.
Timing For Drying
Concrete needs time to cure properly—usually around 48 to 72 hours before you remove the cover. However, full strength develops over 7 to 28 days. You can still handle the bird bath carefully after a few days, but avoid heavy use until it’s fully cured.
Try to keep the bird bath in a shaded, cool spot during curing. Direct sun or wind can cause uneven drying, leading to weak spots. Have you considered how the weather around you might affect the curing time?
Credit: www.familyhandyman.com
Removing The Mold
Mold can damage your concrete bird bath and affect its appearance. Clean the surface with a mild bleach solution and scrub gently. Allow it to dry completely before continuing your project.
Removing the mold from your concrete bird bath is a crucial step. It requires patience and precision. Ensuring a smooth and clean removal will enhance the final look. Follow these simple steps to achieve the best results.Careful Demolding
Begin by gently loosening the edges of the mold. Use a soft tool like a rubber spatula. This prevents damage to the concrete. Slowly work your way around the mold. Be patient to avoid cracking the bird bath. If the mold doesn’t release, give it a bit more time to cure. This ensures the concrete is firm enough.Fixing Imperfections
Inspect the bird bath for any flaws. Small cracks or chips can occur during demolding. Use a concrete patch kit to fix these imperfections. Apply the patch material with a small trowel. Smooth the surface with gentle strokes. This will ensure a polished finish. Allow it to dry completely before painting or sealing. A well-maintained bird bath attracts more feathered visitors.Adding Finishing Touches
Smooth the edges carefully and let the bird bath dry completely. Apply a sealant to protect it from weather and keep it looking fresh. Small details like painting or adding stones can make it more attractive.
Adding those final touches to your concrete bird bath can turn a simple project into a masterpiece that not only serves the birds but also beautifies your garden. This is where your creativity gets to shine and where the real fun begins. Think about what would make your bird bath uniquely yours and a delightful spot for your feathered visitors.Sealing The Surface
Sealing your bird bath is crucial to ensure its longevity. A good sealant protects the concrete from water, weather, and wear. Choose a non-toxic sealant to keep it safe for birds. Apply the sealant evenly using a brush or a sprayer. Make sure to cover every part of the bird bath, including the edges and bottom. Allow it to dry completely before moving on to any decorative steps.Decorative Painting
This is where you can let your imagination soar! Consider painting the outside of your bird bath with colors that complement your garden. Use exterior-grade, water-resistant paint to withstand the elements. Create patterns or motifs that resonate with your garden theme. Perhaps a vine that mirrors the plants nearby, or simple geometric shapes for a modern touch. Remember to let each layer dry thoroughly before adding another. Why not add a splash of whimsy with a few hand-painted birds or flowers? It’s those little details that make your bird bath a conversation piece. What story will your bird bath tell?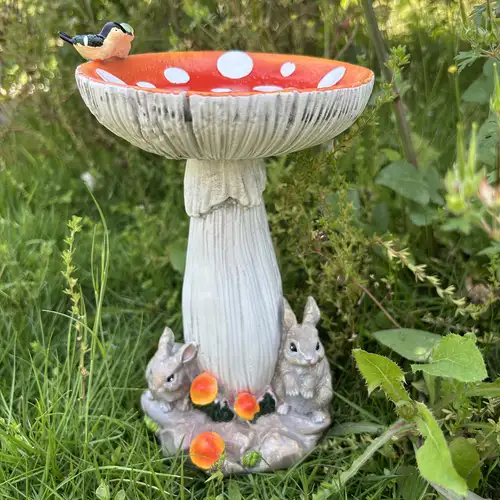
Credit: www.temu.com
Placing In The Garden
Placing your concrete bird bath in the right spot can attract many birds and add charm to your garden. The location affects how often birds visit and how easy it is to keep the bath clean and safe. Choose a place where birds feel comfortable and visitors can enjoy watching them.
Selecting Location
Pick a quiet area away from heavy foot traffic and noisy spots. Birds prefer places where they can see around easily but feel safe from predators. Partial shade works best to keep the water cool and fresh longer. Avoid placing the bath too close to dense bushes or trees where cats or other animals may hide.
- Choose a flat, stable surface for the bird bath.
- Place near plants that attract insects for bird food.
- Ensure good visibility for bird watchers.
- Keep it away from areas with strong wind.
Maintaining The Bird Bath
Keep the water clean and fresh by changing it often. Dirty water can spread disease and discourage birds. Scrub the bath gently with a brush every few days to remove algae and dirt. Use mild soap if needed, then rinse well. During cold months, prevent water from freezing or remove the bath to protect it from cracks.
- Refill water daily, especially in hot weather.
- Remove leaves and debris regularly.
- Check for cracks or damage in the concrete.
- Use bird-safe cleaning materials only.
Frequently Asked Questions
How Long Does It Take For Concrete Bird Bath To Dry?
Concrete bird baths typically dry in 24 to 48 hours. Full curing takes about 7 days for maximum strength. Avoid moving it during this time to prevent cracks or damage.
What Materials Are Needed To Make A Concrete Bird Bath?
You need cement, sand, water, a mixing container, a mold, and a sealant. Optional tools include gloves, a trowel, and a sponge for finishing.
Can I Customize The Shape Of My Concrete Bird Bath?
Yes, you can customize the shape using different molds or by shaping the concrete manually. Creativity allows unique designs suited to your garden style.
How Do I Prevent Cracks In A Concrete Bird Bath?
Mix concrete thoroughly and avoid excess water. Cure the bird bath slowly by keeping it moist for several days. Use reinforcement like wire mesh if needed.
Conclusion
Creating a concrete bird bath is simple and fun. You need just a few materials and some patience. This project adds beauty to your garden and helps birds find water. You can customize the shape and size to fit your space.
Once dry, place it outside and watch birds enjoy it. Making your own bird bath saves money and brings joy. Try this easy craft to enhance your outdoor area today.


