
If you love watching birds visit your yard, mounting a bird feeder on a metal pole is a simple way to attract more feathered friends. But how do you make sure your feeder stays secure and safe?
You might wonder which tools to use or how to prevent wobbling in the wind. This guide will walk you through easy steps to mount your bird feeder firmly on a metal pole, so you can enjoy peaceful birdwatching without any hassle.
Keep reading—you’ll discover practical tips that make the whole process quick and stress-free.
Credit: www.etsy.com
Choosing The Right Metal Pole
Choosing the right metal pole is key to a sturdy and safe bird feeder setup. The pole must hold the feeder securely and resist weather damage. It also needs to fit the feeder’s mounting system perfectly. Picking the right height and diameter helps attract birds while keeping predators away. This section breaks down the important factors to consider for your metal pole.
Pole Material Options
Metal poles come in different materials. Steel poles are strong and last long. They can resist wind and heavy feeders well. Aluminum poles are lighter and rust-resistant. They work great for smaller feeders and easy installation. Galvanized steel is coated to prevent rust. This option combines strength and weather protection. Choose a material based on your local weather and feeder size.
Ideal Pole Height
The height of the pole affects bird safety and visibility. Poles between 4 and 6 feet tall work best for most feeders. This height keeps feeders away from ground predators. It also makes birdwatching easier. Taller poles can help if you have many predators or want to place feeders above bushes. Avoid poles that are too short or too tall for your yard.
Pole Diameter Considerations
Diameter matters for stability and feeder attachment. Poles with a diameter between 1 and 2 inches fit most feeder mounts. Larger diameters add strength but may need special brackets. Thin poles are easier to handle but may bend under heavy feeders. Match the pole diameter to your feeder’s mounting hardware. This ensures a firm and safe hold.

Credit: www.amazon.com
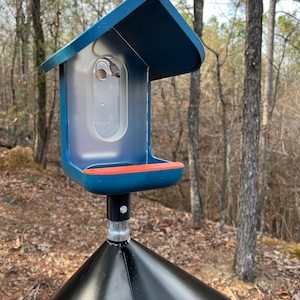
Selecting The Perfect Bird Feeder
Selecting the perfect bird feeder sets the foundation for a successful bird feeding experience. The right feeder attracts a variety of birds and fits well on your metal pole. Consider the type, size, weight, and durability before making a choice.
Types Of Bird Feeders
Choose a feeder that suits the birds you want to attract. Tube feeders work well for small birds like finches. Hopper feeders hold more food and attract larger birds. Platform feeders offer easy access for many bird types. Nyjer feeders specialize in tiny seeds for finches and siskins. Each type has its unique design and feeding style.
Weight And Size Compatibility
Check the weight of the feeder before mounting it on the metal pole. Heavy feeders need strong poles and secure mounting brackets. Small feeders are easier to hang and maintain. Make sure the feeder size matches the pole diameter for a stable fit. Avoid feeders that are too large or heavy for your pole.
Weather-resistant Features
Pick a feeder that withstands rain, wind, and sun. Materials like metal, plastic, and treated wood last longer outdoors. Look for rust-proof coatings and UV protection. Clear seed windows help you monitor food levels. A weather-resistant feeder reduces maintenance and keeps birds safe.
Tools And Materials Needed
Getting your bird feeder mounted on a metal pole is easier when you have the right tools and materials ready. Having everything at hand saves you time and keeps frustration at bay. Let’s break down what you’ll need to make this project smooth and successful.
Basic Tools List
- Drill:Essential for making holes in the metal pole or attaching brackets.
- Screwdriver:A Phillips or flathead screwdriver will help tighten screws securely.
- Wrench or Socket Set:Useful for tightening bolts and nuts on mounting hardware.
- Measuring Tape:To measure pole height and placement for balanced mounting.
- Level:Ensures your feeder hangs straight, preventing seed spillage.
- Marker or Pencil:For marking drill points on the pole.
Having these basic tools makes the process straightforward. Do you already have some of these in your toolbox?
Mounting Hardware Options
Choosing the right mounting hardware depends on your pole type and feeder design. Here are common options:
| Hardware Type | Best For | Pros | Cons |
|---|---|---|---|
| U-bolts | Round metal poles | Strong hold, easy to install | May require drilling pilot holes |
| Pipe Clamps | Various pole sizes | Adjustable, reusable | Can be bulky |
| Mounting Brackets | Flat or square poles | Stable and secure | May need precise fitting |
Which hardware feels right for your setup? Sometimes testing a couple can reveal the best fit.
Safety Gear
Protecting yourself during installation is key. Basic safety gear includes:
- Gloves:Shield your hands from sharp edges and rough surfaces.
- Safety Glasses:Prevent dust or metal shards from getting into your eyes.
- Closed-Toe Shoes:Protect your feet in case you drop tools or hardware.
Think about your safety before starting. Are you prepared to handle the metal pole and tools safely?
Preparing The Metal Pole
Clean the metal pole thoroughly to remove dirt and rust. Use sandpaper for a smooth surface, ensuring the feeder will hold securely. Apply a primer or paint to protect the metal from weather damage.
Preparing a metal pole for a bird feeder can be simple. This process ensures that the feeder stays secure. It also makes sure the birds have a safe place to eat.Cleaning The Surface
Start by cleaning the metal pole. Remove any dirt or rust. Use a damp cloth and mild soap. Scrub the surface gently. Rinse with water and let it dry completely. A clean surface ensures better adhesion.Marking Mounting Points
Next, mark the mounting points. Use a measuring tape for accuracy. A pencil or chalk works well for marking. Ensure the marks are evenly spaced. This helps in balancing the feeder.Drilling Holes Safely
Drill holes at the marked points. Use a drill bit suitable for metal. Wear safety goggles to protect your eyes. Drill slowly to avoid slipping. Clean the debris after drilling. This prepares the pole for mounting the bird feeder.Mounting Techniques
Mounting a bird feeder on a metal pole can seem tricky. Choosing the right technique ensures stability and safety for the birds. Let’s explore some methods to achieve a secure setup.
Using Brackets And Clamps
Brackets and clamps offer a simple mounting solution. They easily attach to most metal poles. Start by selecting the right size clamp for your pole. Tighten it firmly to prevent slipping. Attach the bracket to the clamp. Ensure it’s level and secure. This method is quick and effective.
Securing With Screws And Bolts
Screws and bolts provide a more permanent solution. Drill holes into the metal pole for a snug fit. Use rust-resistant screws or bolts. Align the feeder bracket and insert the screws. Tighten them securely to prevent movement. This technique offers strong stability.
Alternative Attachment Methods
If clamps and screws are not an option, consider adhesive mounts. These are ideal for smooth surfaces. Clean the pole to ensure good adhesion. Press the adhesive firmly for a secure bond. Another option is using zip ties for a temporary setup. Ensure they’re tightly fastened for support.
Ensuring Stability And Security
Ensuring the stability and security of your bird feeder on a metal pole keeps birds safe and prevents damage. A steady mount avoids wobbling and falling during windy days. It helps birds feed peacefully without fear. Focus on checking the pole’s firmness and securing the feeder tightly.
Checking For Movement
Test the pole by gently pushing it in different directions. Watch for any shaking or bending. Even small movements can cause the feeder to fall. Look at the ground where the pole is fixed. Make sure it is firm and solid. If the pole moves easily, it needs better support.
Reinforcing The Mount
Use strong brackets or clamps designed for metal poles. Tighten all screws and bolts firmly. Wrap the pole with weather-resistant tape for extra grip. Adding a metal brace at the base can stop wobbling. Secure the feeder with a chain or cable if needed. This keeps it from swinging in the wind.
Regular Maintenance Tips
- Check the pole and feeder every few weeks.
- Tighten loose screws or bolts immediately.
- Look for rust or wear on metal parts.
- Clean the feeder to avoid bird diseases.
- Replace damaged parts quickly to maintain safety.
Positioning For Bird Attraction
Proper positioning of your bird feeder on a metal pole boosts bird visits. Birds prefer safe, easy-to-access spots. Small changes in placement can increase activity around your feeder. Consider height, safety, and light for the best results.
Optimal Height And Location
Set the feeder about 5 to 6 feet above ground. This height is easy for birds to reach and safe from some animals. Place the pole near trees or bushes. These spots offer birds shelter and quick escape routes. Avoid open areas with strong wind or heavy foot traffic.
Avoiding Predators
Keep the feeder away from places where cats or squirrels hide. Leave at least 10 feet of clear space around the pole. Avoid placing the feeder near fences or low branches. Birds need room to spot predators early. A safe feeder means more bird visits and less stress for them.
Sunlight And Shade Balance
Choose a spot that gets morning sun and afternoon shade. Sunlight warms the feeder, helping seeds stay dry. Shade protects birds from hot midday sun. This balance keeps birds comfortable and food fresh. Rotate the feeder if shade changes with seasons.
Troubleshooting Common Issues
Mounting a bird feeder on a metal pole is a great way to attract feathered friends to your yard. But even with careful installation, some common issues can arise that affect the feeder’s stability and longevity. Knowing how to troubleshoot these problems will save you time and keep your feeder in top shape.
Dealing With Rust
Rust can quickly weaken your metal pole and make your feeder look worn out. To prevent rust, start by choosing poles made from rust-resistant materials like aluminum or galvanized steel. If you spot rust forming, scrub the area gently with a wire brush and apply a rust-inhibiting primer followed by outdoor metal paint.
Have you ever ignored small rust spots only to see them spread? Tackling rust early keeps your pole strong and your feeder secure for seasons to come.
Handling Loose Fixtures
Loose fixtures are a common annoyance that can cause your feeder to wobble or fall. Check the bolts and screws regularly and tighten them as needed using a wrench or screwdriver. Using lock washers or thread-locking adhesive can help keep these fasteners from loosening over time.
Imagine watching your favorite birds fly away just as the feeder falls—frustrating, right? Keeping fixtures tight ensures your feeder stays put and your visitors stay happy.
Preventing Sway In Wind
Wind can cause your feeder to swing, making it hard for birds to feed and potentially damaging the feeder. To reduce sway, try adding guy wires anchored to the ground or attach a stabilizing weight near the base of the pole. Another trick is wrapping the pole with a rubber grip or using a bungee cord to limit movement.
Have you noticed how a swinging feeder keeps birds away? Minimizing sway creates a calm feeding spot that encourages more visits.

Credit: www.familyhandyman.com
Frequently Asked Questions
How Do I Secure A Bird Feeder To A Metal Pole?
Use sturdy brackets or metal straps to firmly attach the feeder. Ensure the pole is stable. Tighten all fasteners to prevent wobbling or falling.
What Tools Are Needed To Mount On A Metal Pole?
You need a drill, screwdriver, metal brackets, screws, and measuring tape. These tools help ensure a secure and precise installation.
Can I Use Any Metal Pole For Bird Feeders?
Choose a pole that is rust-resistant and sturdy enough to hold the feeder’s weight. Avoid thin or weak poles for safety.
How High Should I Mount A Bird Feeder On A Pole?
Mount the feeder 4 to 6 feet above ground. This height keeps birds safe from predators and makes feeding easier to observe.
Conclusion
Mounting a bird feeder on a metal pole is simple with the right steps. Secure the feeder tightly to keep it stable and safe. Choose a good spot where birds can easily find food. Check the feeder regularly to keep it clean and full.
Enjoy watching birds visit your garden every day. Small efforts bring great joy and help nature thrive. Try it today and see the difference in your outdoor space.


