
Do you want to give your game a fresh perspective that makes everything clear at a glance? A Birds Eye View Camera in Unity can do just that.
It lets you see your entire scene from above, giving you control and insight like never before. Whether you’re building a strategy game or just need a better way to navigate your world, this guide will show you exactly how to set it up step-by-step.
Keep reading, and you’ll have your camera working perfectly in no time.
Credit: medium.com
Setting Up The Project
Creating a birds eye view camera in Unity starts with a proper project setup. This guide covers the first steps to prepare your workspace.
We will begin by creating a new Unity project and then importing the packages needed for the camera setup.
Creating A New Unity Project
Open Unity Hub and create a new project. Choose the 3D template to suit the camera’s perspective needs.
- Launch Unity Hub.
- Click on “New Project”.
- Select the “3D” template.
- Name your project, for example, “BirdsEyeCamera”.
- Pick a save location on your computer.
- Click “Create”.
Importing Necessary Packages
To build the camera system, you need to import certain Unity packages. These include standard assets or any additional tools for camera control.
| Package Name | Purpose | How to Import |
|---|---|---|
| Standard Assets | Provides basic camera scripts and prefabs | Use Unity Package Manager or import from Unity Asset Store |
| Cinemachine | Advanced camera control and smooth transitions | Install via Package Manager under Unity Registry |
| Post Processing | Improves visual quality with effects | Install via Package Manager |

Credit: medium.com
Configuring The Camera
Setting up a bird’s eye view camera in Unity requires careful configuration. The camera must capture the scene from above to give a clear top-down view.
This guide covers how to choose the right camera, position it correctly, and adjust its angle and height for the best view.
Choosing The Right Camera Type
Unity offers different camera types. For a bird’s eye view, you usually pick between perspective and orthographic cameras.
- Perspective Camera:Shows depth and distance but may distort the top-down view.
- Orthographic Camera:Removes perspective distortion for a flat, map-like view.
- Custom Cameras:You can adjust settings or use scripts to create specific effects.
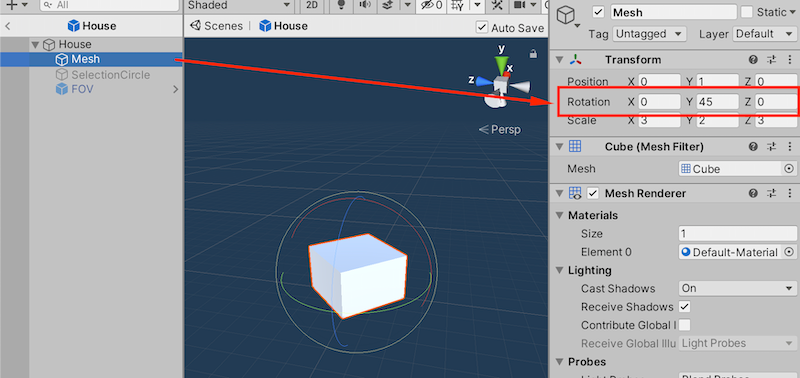
Positioning The Camera For Bird’s Eye View
Place the camera directly above the scene. Its position depends on the area you want to cover and the game’s scale.
| Camera Position | Description |
| X and Z Coordinates | Center above the target area for full coverage |
| Y Coordinate | Height above the scene for wide or close view |
| Rotation | Look straight down with 90 degrees on X axis |
Adjusting Camera Angle And Height
Change the camera’s angle and height to get the perfect view. A 90-degree angle points the camera straight down.
- Set the camera’s X rotation to 90 degrees for a top-down view.
- Raise the camera on the Y axis to increase the visible area.
- Lower the height for more detail but less coverage.
- Test different heights to balance detail and field of view.
Implementing Camera Controls
Creating a birds eye view camera in Unity needs careful control setup.
This guide explains how to add pan, zoom, and smooth movement features.
Adding Pan And Zoom Features
Pan lets players move the camera horizontally and vertically.
Zoom changes how close or far the camera is from the scene.
- Use mouse drag or touch drag for panning the camera.
- Adjust camera’s orthographic size or field of view to zoom.
- Clamp zoom levels to avoid too close or too far views.
- Update camera position smoothly during pan and zoom actions.
Setting Boundaries For Camera Movement
Setting limits stops the camera from moving outside the game area.
| Boundary Type | Description |
| Horizontal Limit | Prevents camera from moving left or right beyond map edges |
| Vertical Limit | Stops camera from moving up or down past playable area |
| Zoom Limit | Restricts zoom so camera stays within useful view range |
Use math functions to clamp the camera’s position within these bounds.
Smooth Transitions And Follow Mechanics
Smooth camera moves improve player experience and avoid jarring jumps.
Follow mechanics keep the camera focused on a target, like a player character.
public Transform target; public float smoothSpeed = 0.125f; public Vector3 offset; void LateUpdate() { Vector3 desiredPosition = target.position + offset; Vector3 smoothedPosition = Vector3.Lerp(transform.position, desiredPosition, smoothSpeed); transform.position = smoothedPosition; } 
Credit: medium.com
Optimizing Performance
Using a birds eye view camera in Unity can slow down your game. Optimizing performance helps your game run smoothly. You need to reduce extra work done by the camera.
Small changes can make a big difference in frame rate. This guide covers key ways to improve performance.
Culling And Layer Management
Culling stops the camera from rendering objects it cannot see. It saves processing power by ignoring hidden items.
Using layers helps you control what the camera shows. You can exclude unneeded objects from rendering.
- Set up layers for different object types
- Use camera culling masks to include only needed layers
- Enable frustum culling to avoid drawing objects outside the view
Adjusting Render Settings
Lowering render settings reduces the workload on the GPU. This helps maintain good frame rates with a birds eye camera.
You can adjust resolution, shadows, and texture quality to find a balance between look and speed.
- Reduce the render texture size if using one
- Turn off shadows or reduce shadow resolution
- Lower texture quality on distant objects
Reducing Draw Calls
Draw calls tell the GPU to draw objects. Many calls slow the game down. Combine objects to cut draw calls.
Use batching and static objects to reduce the number of calls needed per frame.
- Use Unity’s static batching for non-moving objects
- Use dynamic batching for small moving objects
- Merge meshes that use the same material
Enhancing Visuals
Creating a birds eye view camera in Unity needs careful visual design. This helps players see the game from above clearly. Enhancing visuals makes the game more attractive and easier to play.
This guide covers key techniques to improve the look of your top-down camera. Lighting, effects, and camera settings all play a role in the final image.
Lighting And Shadows For Top-down Views
Lighting sets the mood and depth in top-down views. Use soft shadows to avoid harsh lines. This adds realism without blocking important game parts.
- Use directional lights angled slightly to create soft shadows.
- Adjust shadow strength to keep details visible.
- Use ambient light to brighten darker areas evenly.
- Try baking lighting for better performance in static scenes.
Using Post-processing Effects
Post-processing adds polish by changing colors and effects after rendering. These effects improve clarity and style for a birds eye camera.
| Effect | Purpose | Tips |
| Bloom | Adds glow to bright areas | Use lightly to avoid blur |
| Color Grading | Adjusts overall colors | Match game tone and mood |
| Depth of Field | Blurs background or foreground | Use subtly to keep focus clear |
| Vignette | Darkens edges of screen | Focuses player attention to center |
Customizing Camera Effects
Customize camera settings to fit your game style. Adjust field of view and add effects that suit the top-down look.
Camera Settings to Try:
- Set orthographic projection for a flat, 2D look.
- Use smooth camera movement to follow the player gently.
- Apply screen shake effects carefully to show impact.
- Adjust clipping planes to avoid seeing unwanted objects.
Testing And Debugging
Testing and debugging a bird’s eye view camera in Unity is important. It helps find and fix problems early.
Good testing ensures smooth camera movement and clear views. It improves player experience and game quality.
Common Issues With Bird’s Eye Cameras
Bird’s eye cameras often face problems like clipping, wrong angles, or jittery movement. These issues affect visibility.
Camera clipping happens when the view passes through objects. Angles may be too steep or too flat. Jitter makes the view shake.
- Objects cutting into the camera view
- Camera angle not showing important areas
- Camera shaking or moving unevenly
Debugging Camera Movement
Use Unity’s Scene view to watch camera movements during play. This helps spot unwanted motion or wrong positions.
Check the camera’s follow script for smooth transitions. Adjust speed and damping values to reduce jitter.
- Use Debug.Log to track camera positions
- Test different movement speeds
- Adjust smoothing or interpolation settings
- Check for collisions with environment objects
User Feedback Integration
Listening to user feedback helps improve camera controls. Players often notice small issues first.
Collect feedback on camera angle, speed, and control feel. Use this input to make adjustments that fit player needs.
- Ask players if camera view feels clear
- Request input on camera movement speed
- Use feedback to tweak camera settings
- Test updates with users to confirm fixes
Advanced Techniques
Using a birds eye view camera in Unity can add depth to your game. Advanced techniques help the camera react smoothly to changes. These methods improve player experience and game flow.
This guide covers dynamic camera adjustments, AI integration, and multi-camera setups. Each section explains how to build smarter camera systems for complex games.
Dynamic Camera Adjustments Based On Game State
Change camera settings depending on what happens in the game. For example, zoom in during combat or zoom out for exploration. Adjust angles to give the best view for each situation.
- Track player speed to adjust camera distance
- Focus on important objects or enemies
- Change height to show more area when needed
- Smoothly transition between camera modes
Integrating With Ai And Pathfinding
Use AI data to guide the camera’s behavior. Link the camera to pathfinding systems to predict player moves. This helps the camera stay ahead and avoid sudden cuts.
| AI Input | Camera Response | Benefit |
| Player target location | Shift camera focus | Shows goal clearly |
| Enemy alert state | Zoom in and center | Highlights threats |
| Player path direction | Pan smoothly ahead | Predictive view |
Multi-camera Setups
Use multiple cameras to capture different views. Switch or blend between cameras based on game needs. This adds variety and clarity to the player’s perspective.
Example multi-camera setup options:
- Main bird’s eye camera for general view
- Close-up camera for detailed action
- Side camera for special effects or cutscenes
- Mini-map camera showing player location
Frequently Asked Questions
What Is A Bird’s Eye View Camera In Unity?
A bird’s eye view camera in Unity provides an overhead perspective. It simulates a view from above, often used in strategy games. This camera type enhances spatial awareness and navigation. It’s ideal for showcasing large environments and understanding spatial relationships.
Unity’s features make implementing a bird’s eye view efficient.
How Do You Set Up A Bird’s Eye View?
To set up a bird’s eye view, position the camera above the scene. Adjust the angle to look directly downwards. Set the camera’s field of view to cover the desired area. Use Unity’s camera tools for precise adjustments. This setup enhances your game’s strategic elements and visibility.
What Are The Benefits Of Using This View?
This view provides a comprehensive perspective of the game environment. It enhances strategic planning and navigation. Players can easily understand spatial relationships and game dynamics. It’s particularly useful for games requiring tactical decisions. This view can make complex environments more accessible and engaging.
Can You Switch Views Dynamically In Unity?
Yes, you can switch views dynamically in Unity. Use scripts to change camera positions and angles during gameplay. This allows for flexible perspectives and enhances player experience. Dynamic view switching can highlight different game elements. Unity’s scripting capabilities make implementing this feature seamless and efficient.
Conclusion
Creating a birds eye view camera in Unity is simple and useful. It helps players see the whole scene from above. Adjusting the camera’s height and angle gives the best view. Remember to test your camera to avoid blind spots.
Use this method to improve your game’s design and user experience. Keep practicing to make smooth and clear camera movement. Try adding features like zoom or follow for more fun. This skill adds value to your Unity projects and makes games easier to play.


