
Are you looking to add a charming touch to your garden that attracts beautiful birds and gives you a peaceful spot to enjoy nature? Making your own concrete bird bath is easier than you think, and it’s a rewarding project you can complete in just a few steps.
Imagine watching colorful birds splash and play right in your backyard, all thanks to something you crafted with your own hands. In this guide, you’ll discover simple, clear instructions that turn ordinary materials into a stunning bird bath. Ready to create a lasting feature that brings life and joy to your outdoor space?
Let’s dive in and get started!
Choosing The Right Materials
Choosing the right materials is key to making a strong and lasting concrete bird bath. The materials affect the look, durability, and ease of making your bird bath. Picking the proper concrete mix and having the right tools helps ensure a smooth project. Use simple, easy-to-find supplies for the best results.
Selecting Concrete Mix
Choose a concrete mix designed for outdoor use. Look for mixes labeled “quick-setting” or “high-strength.” These dry faster and hold up well against weather. Avoid plain cement or mixes meant for indoor projects.
Consider using a mix with small gravel for better texture and strength. You can also add a concrete bonding agent to improve durability. Follow package instructions for water amounts to get the perfect consistency.
Tools And Accessories Needed
Gather all tools before starting. This makes the process faster and easier. Basic tools include:
- Mixing bucket or wheelbarrow
- Trowel for smoothing
- Rubber gloves to protect hands
- Measuring cup for water
- Mold or container for shaping the bird bath
- Plastic sheet or tarp for curing
Optional items like a concrete vibrator or float can help create a smooth finish. Use simple, sturdy tools to keep the project manageable and enjoyable.

Credit: www.dukemanorfarm.com
Designing Your Bird Bath
Designing your bird bath sets the tone for its style and function. Thoughtful design makes it a favorite spot for birds and a charming garden feature. Choosing the right shape and size ensures it fits your space and attracts birds. Making a mold shapes the foundation for your concrete bird bath. Both steps combine creativity and practicality for a beautiful result.
Picking A Shape And Size
Start with the shape that fits your garden style. Round, square, or oval shapes work well. Round shapes are classic and simple. Square or rectangular shapes add a modern touch. Consider the size carefully. A small bird bath suits compact gardens or patios. Larger ones create a bold garden centerpiece. Keep the basin shallow, about 2 inches deep, safe for birds to drink and bathe. The diameter should be at least 12 inches for comfort.
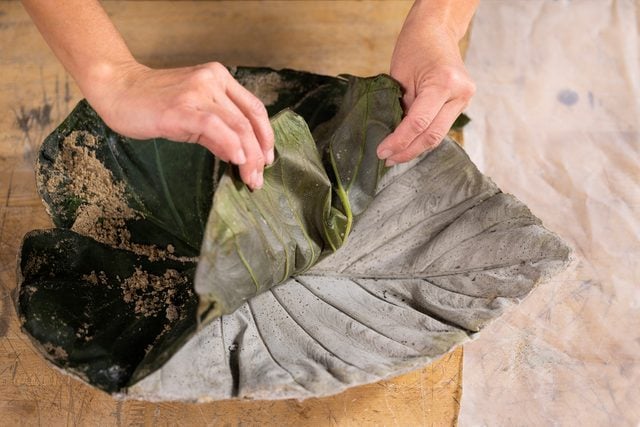
Creating A Mold
Use a mold to form the concrete shape. Household items like bowls or plastic containers make easy molds. Choose one with smooth surfaces for a neat finish. Grease the mold with cooking spray or oil to release the concrete easily. For custom shapes, build a mold from wood or cardboard. Secure edges tightly to avoid leaks. Ensure the mold is sturdy to hold the concrete weight. Let the concrete set fully before removing the mold. This step defines the final bird bath shape and smoothness.
Preparing The Workspace
Preparing your workspace is a key step before making a concrete bird bath. A clean, organized area helps you work safely and efficiently. It also protects your surroundings from mess and damage. Take time to set up the right spot and gather all needed supplies. This makes the building process smoother and more enjoyable.
Setting Up A Safe Area
Choose a flat, sturdy surface outdoors or in a well-ventilated space. Concrete dust and mix can be messy and harmful if inhaled. Cover nearby plants or furniture with plastic sheets. Keep children and pets away during work. Wear gloves and a mask to protect your skin and lungs. Make sure you have easy access to water for cleaning.
Gathering Supplies
Collect everything before starting to avoid interruptions. Essential items include:
- Concrete mix suitable for outdoor use
- Water for mixing
- Mold or container for shaping the bird bath
- Mixing bucket or wheelbarrow
- Trowel or spatula for smoothing
- Protective gloves and mask
- Plastic sheet or tarp to protect the ground
Having all tools ready helps maintain focus and speeds up the project.
Credit: www.familyhandyman.com
Mixing And Pouring Concrete
Mixing and pouring concrete is the heart of creating a sturdy and attractive bird bath. The right consistency and careful pouring will determine how well your bird bath holds up outdoors. It’s a hands-on process that requires attention but also invites you to enjoy the tactile satisfaction of crafting something useful with your own hands.
Measuring And Mixing
Start by measuring your materials carefully. Use a ratio of about 3 parts sand to 1 part cement, with enough water to get a thick, pancake-batter-like consistency. Too much water will weaken the concrete, while too little makes it hard to pour.
Mix the dry ingredients first in a wheelbarrow or bucket, then slowly add water. Stir continuously with a trowel or a stick until the mixture looks smooth and holds together without being runny.
Think about how the texture feels—does it hold its shape when you scoop some up? If not, adjust by adding a little more cement or water to get it just right.
Pouring Into The Mold
Before pouring, lightly oil your mold to prevent sticking. Pour the concrete slowly and evenly to avoid air bubbles, which can cause weak spots in your bird bath.
Use a small stick or trowel to push the concrete into corners and smooth the surface. Tapping the sides of the mold gently helps bubbles rise to the top and pop.
Have you noticed how concrete changes texture as it settles? Keep an eye on it and smooth it again if needed before it starts to harden. This step makes a big difference in the final look and durability.
Adding Decorative Touches
Adding decorative touches to your concrete bird bath brings charm and personality. These details make the bird bath stand out in any garden. Simple decorations can turn a plain bird bath into a beautiful garden feature.
Choose decorations that match your garden style. Bright colors, natural stones, or artistic patterns can enhance the look. Small details can make a big difference in appearance and feel.
Embedding Stones Or Tiles
Embedding stones or tiles into the concrete adds texture and color. Choose smooth, flat stones or colorful tiles for best results. Press them gently into the wet concrete before it hardens. Arrange them in patterns or random designs to create a unique look.
Use pieces that are safe for birds and weather-resistant. Pebbles, glass gems, or ceramic tiles work well. Clean the stones or tiles before embedding to ensure they stick firmly. This technique adds a natural or artistic touch to your bird bath.
Using Paint And Sealants
Painting your concrete bird bath adds vibrant colors and patterns. Use outdoor acrylic paint for durability. Paint simple designs or bold colors depending on your taste. Let the paint dry completely before applying sealant.
Sealants protect the paint and concrete from water and weather damage. Choose a clear, waterproof sealant made for outdoor use. Apply several thin coats for best protection. Sealants also make cleaning easier and keep the bird bath looking fresh longer.
Curing And Finishing
Allow the concrete to cure slowly to avoid cracks and ensure strength. Smooth the surface with fine sandpaper for a polished finish. Seal the bird bath to protect it from weather damage.
Curing and finishing your concrete bird bath is crucial to ensure it stands up against the elements and provides a safe haven for birds. Once you’ve poured your concrete and shaped your bath, the hard part might seem over. However, this final phase requires patience and attention to detail to achieve a durable and attractive bird bath.Drying Time Tips
Allowing your concrete to dry properly is essential. Typically, concrete needs about 24 to 48 hours to set. However, for full curing, it’s wise to wait at least a week. Cover your bird bath with a plastic sheet to retain moisture and prevent cracks. Keeping the concrete wet during this period can strengthen it, so consider misting it lightly with water daily. Have you ever rushed through a project only to regret it later? Avoid this pitfall by giving your concrete the time it needs. Your patience will pay off with a bird bath that lasts for years.Removing The Mold
After the curing period, it’s time to unveil your creation. Carefully remove the mold to reveal the bird bath. Use gentle taps with a rubber mallet to loosen any stubborn spots. If you used a release agent, this step should be straightforward. Remember the thrill of unboxing a new gadget? Removing the mold is just as exciting. It’s the moment you finally see your hard work take shape. Once the mold is off, inspect your bird bath for any rough edges. A little sanding can smooth out imperfections, making it safe for our feathered friends. Now, your bird bath is ready for its finishing touches. Consider adding a sealant for extra protection against water and weather.Placing And Maintaining Your Bird Bath
Choose a flat, shaded spot to place your concrete bird bath for stability and comfort. Clean the water regularly to keep birds safe and happy. Check the bath often to prevent cracks or dirt buildup.
Placing and maintaining your bird bath is crucial to ensuring it becomes a favorite spot for local birds. Proper placement not only makes it an attractive feature in your garden but also enhances its functionality. Maintenance ensures it remains a clean, safe haven for your feathered visitors.Choosing The Perfect Spot
Finding the right location for your bird bath is essential. Place it in a spot where it can be easily seen from a window, providing you with endless entertainment. Ensure it’s near some bushes or trees, offering birds a quick escape route from predators. Avoid placing it directly under trees where falling leaves and droppings can contaminate the water. Consider the sun’s position; too much sun can heat the water, while too much shade might cause mold. Experiment with different spots and observe where birds feel most comfortable visiting.Cleaning And Care
Regular cleaning keeps your bird bath inviting and safe. Empty the water every few days to prevent algae growth and mosquito breeding. Scrub the basin with a brush and rinse thoroughly to remove any debris or soap residue. Use a mixture of vinegar and water for a natural cleaning solution. Avoid harsh chemicals that could harm the birds. Think about how you’d feel drinking from a dirty cup—birds deserve fresh, clean water too. Remember, a well-maintained bird bath not only attracts more birds but also supports their health and well-being. How often do you check your bird bath’s water quality? Your efforts make a big difference in the lives of these small creatures.
Credit: www.dukemanorfarm.com
Frequently Asked Questions
How Do I Make A Concrete Bird Bath?
Start by mixing concrete with water to a thick consistency. Pour into a mold or basin and let it cure for 24-48 hours. Once hardened, remove the mold and smooth edges with sandpaper for a finished look.
What Materials Are Needed For A Concrete Bird Bath?
You’ll need quick-setting concrete mix, water, a mold or basin, a mixing container, a trowel, and sandpaper. Optional items include sealant and decorative stones to enhance appearance and durability.
How Long Does Concrete Take To Cure For Bird Baths?
Concrete typically cures in 24 to 48 hours but reaches full strength in 7 days. Avoid moving the bird bath during curing to prevent cracks or damage.
Can I Paint Or Seal A Concrete Bird Bath?
Yes, use waterproof, non-toxic paint or sealant to protect the bird bath. This helps prevent water absorption and extends the bird bath’s life while maintaining safety for birds.
Conclusion
Making a concrete bird bath is simple and fun. You only need a few materials and some patience. This project adds beauty to your garden and helps birds feel welcome. You can customize the shape and size to fit your space.
Once dry, place it in a sunny spot with water. Watch birds enjoy their new bath every day. Try this easy craft to bring nature closer to home. Enjoy the calm and joy it brings to your outdoor space.


