
Are you looking to add a charming touch to your garden that attracts beautiful birds while being easy to make? A cement bird bath is the perfect project for you.
It’s sturdy, weatherproof, and can be customized to fit your style. Plus, creating it yourself means you get a unique piece that brings life and tranquility right to your outdoor space. Keep reading, and you’ll discover simple steps to make your own cement bird bath that will impress both you and your feathered visitors.
Credit: www.familyhandyman.com
Choosing Materials
Choosing the right materials is essential for making a durable cement bird bath. Quality materials ensure the bird bath lasts long and looks great. Selecting the proper cement and gathering all necessary tools make the process smooth and enjoyable.
Selecting Cement Type
Use Portland cement for the best results. It is strong and sets quickly. Avoid using fast-dry cement, as it may crack easily. A mix of one part cement to two parts sand works well. This mix is strong and easy to shape. Consider using a pre-mixed concrete blend for convenience. It contains cement, sand, and small gravel.
Gathering Tools And Supplies
Prepare all tools before starting. This saves time and frustration. Essential tools include:
- Mixing bucket or wheelbarrow
- Trowel or putty knife
- Measuring cup or container
- Protective gloves
- Plastic sheet or tarp
- Mold or basin for shaping
- Water source for mixing
Gathering these supplies helps keep your workspace organized. It also makes the cement bird bath project easier to complete.
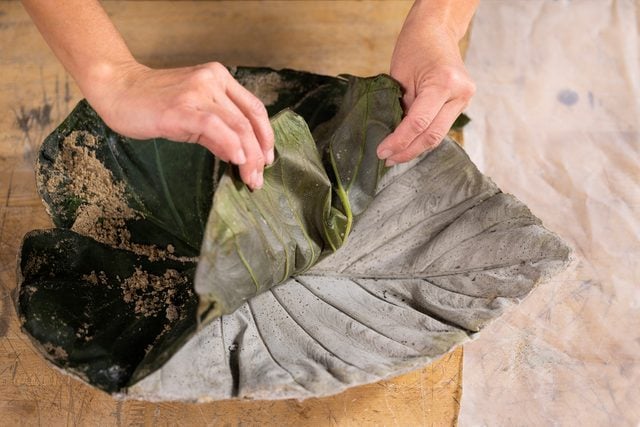
Preparing The Mold
Preparing the mold is a key step in making a cement bird bath. The mold shapes the cement and gives the bird bath its form. Choosing the right mold and shaping it correctly ensures a smooth and stable bird bath. This step helps avoid cracks and uneven surfaces in the final product.
Using Household Items
Household items work well as molds for cement bird baths. Bowls, plates, or old containers can create the basin shape. Look for items with smooth surfaces and the right size for your bird bath.
- Plastic bowls are lightweight and easy to remove.
- Metal or ceramic dishes provide sturdy shapes.
- Use a larger container to hold the cement mold.
Cover the mold with plastic wrap or cooking spray. This stops cement from sticking and makes removal easier.
Shaping The Basin
Shape the basin carefully for water to collect well. The basin should have a shallow, rounded shape. Avoid sharp edges that can break or hurt birds.
Use sandpaper to smooth rough areas on the mold. Adjust the mold with tape or clay to get the right curve. Check that the basin slopes gently to the center.
Ensure the mold is stable before pouring cement. A steady mold keeps the basin even and strong.
Mixing The Cement
Mixing cement correctly is key to building a sturdy bird bath. The right mix makes the cement strong and easy to shape. Avoid making it too thick or too runny. A balanced mix ensures your bird bath lasts long and looks great.
Measuring Ingredients
Use accurate measurements for a strong cement mix. Follow these guidelines:
- Use one part cement powder.
- Add two parts sand for strength.
- Include three parts gravel for texture.
- Add water slowly to avoid a thin mixture.
Measure with a bucket or container for even results. Consistent ratios prevent cracks and weak spots.
Achieving The Right Consistency
Mix until the cement looks like thick mud. It should hold shape but be easy to spread. Avoid dry lumps or watery runs.
- Stir the dry ingredients together first.
- Add water little by little while mixing.
- Use a trowel or stick for stirring.
- Stop adding water when it forms a smooth paste.
Test by scooping some cement. It should drop slowly but not drip.

Credit: www.dukemanorfarm.com
Pouring And Shaping
Pouring and shaping cement is the heart of creating a beautiful bird bath. This stage needs patience and care to get the right form and smooth finish. The cement mix should be just right—not too thick or thin—to fill the mold perfectly.
Filling The Mold
Start by preparing your mold on a flat surface. Pour the cement slowly into the mold to avoid air bubbles. Tap the sides gently to help the cement settle and fill all corners. Use a stick or spatula to push the cement into hard-to-reach areas. Fill the mold evenly to keep the thickness consistent. Let some cement overflow if needed; it can be smoothed later.
Smoothing The Surface
After filling, smooth the top with a trowel or a flat tool. Move the tool in small, circular motions to create an even surface. Check for any bumps or holes and fill them with extra cement. Wet the tool slightly to prevent sticking. A smooth surface helps the bird bath look neat and lasts longer. Let the cement set a little before doing the final smoothing to avoid pulling up too much material.
Curing Process
The curing process is a crucial step in making a strong and durable cement bird bath. It helps the cement dry evenly and gain maximum strength. Proper curing also prevents cracks and damage caused by quick drying or harsh weather.
Curing involves keeping the cement moist and at the right temperature for several days. This allows the cement to harden slowly and fully. Skipping or rushing this step can lead to a weak bird bath that breaks easily.
Drying Time
The drying time for cement usually lasts about 7 days. During this period, the cement gains most of its strength. Avoid moving or using the bird bath before this time. The surface should stay moist, not dry or dusty.
Cover the bird bath with plastic sheets or damp cloths to keep moisture in. Spray water on the surface regularly, especially in dry or hot weather. This helps the cement cure evenly and reduces the chance of cracks.
Preventing Cracks
Cracks appear when cement dries too fast or unevenly. To prevent cracks, avoid direct sunlight or strong wind during curing. These can dry out the cement quickly and cause damage.
Use a curing compound or sealant to lock moisture inside the cement. Keep the bird bath in a shaded, cool place for the first week. Handle the bird bath gently and do not place heavy objects on it until fully cured.
Adding Finishing Touches
Adding the finishing touches to your cement bird bath can enhance its beauty. After crafting the basic shape, these final steps make it visually appealing and durable. Let’s explore how you can elevate your bird bath with a few simple techniques.
Painting And Sealing
Begin by choosing a paint suitable for outdoor use. Opt for non-toxic acrylic or latex paints. These are safe for birds and resist weather damage. Apply a base coat to ensure even coverage. Use a brush or spray for smooth application. Allow it to dry completely before adding more layers.
Sealing is crucial to protect the paint from elements. A clear, water-based sealant works well. Apply it evenly over the painted surface. This adds a protective layer and enhances the paint’s vibrancy. Reapply the sealant annually to maintain its effectiveness.
Decorative Enhancements
Consider adding decorative elements to personalize your bird bath. Mosaic tiles offer a colorful, artistic touch. Use weather-resistant adhesive to secure them. Arrange the tiles in patterns or random designs for a unique look.
Natural stones or pebbles can add texture. Glue them around the base or edge. This not only decorates but also provides grip for birds. Ensure all enhancements are securely attached to prevent accidents.
With these finishing touches, your cement bird bath becomes a charming garden feature.
Placing The Bird Bath
Choose a flat, stable spot for your bird bath to prevent tipping. Place it where birds feel safe and can easily access water. Avoid direct sunlight to keep water cool and fresh longer.
Placing your cement bird bath in the right location is crucial for attracting a flurry of feathered friends. A well-chosen spot not only enhances your garden’s aesthetic but also ensures the bird bath is easily accessible and safe for birds. Let’s explore how to choose the best location and keep your bird bath in top condition with some easy maintenance tips.Choosing The Location
When deciding where to place your bird bath, consider both visibility and safety. Birds need to feel secure from predators, so avoid areas where cats or other animals can hide nearby. Aim for a spot that offers a clear line of sight for birds. Placing the bird bath near trees or shrubs can provide birds with a quick escape route if they sense danger. Sunlight is another factor to consider. While direct sunlight can keep the water warm, too much can lead to rapid evaporation. A mix of sun and shade throughout the day can be the perfect balance.Maintenance Tips
Keeping your bird bath clean is vital for the health of visiting birds. Regularly change the water to prevent algae growth and mosquito breeding. Use a simple solution of water and mild dish soap to scrub the surface of the bath. Avoid harsh chemicals that can harm birds and wildlife. Consider placing a small water pump or bubbler in the bath. This not only keeps the water fresh but also creates gentle ripples that attract birds. Remember, a well-maintained bird bath will not only draw more birds but also ensure their safety and well-being. Are you ready to transform your garden into a bird haven?
Credit: www.youtube.com
Frequently Asked Questions
How Do You Mix Cement For A Bird Bath?
Mix cement with sand and water in a 1:2:1 ratio for a sturdy bird bath. Blend until smooth and workable.
What Materials Do I Need To Make A Cement Bird Bath?
You need cement, sand, water, a mixing container, a mold, and a release agent like oil or plastic.
How Long Does Cement Take To Cure For Bird Baths?
Cement typically cures in 24 to 48 hours but reaches full strength in 7 days.
Can I Paint My Cement Bird Bath?
Yes, use non-toxic, waterproof outdoor paint after curing to protect and decorate your bird bath.
Conclusion
Making a cement bird bath is simple and fun. It adds charm to your garden. Birds will love visiting your new bath. You only need basic materials and tools. Follow the steps carefully for best results. Let the cement dry fully before use.
Place the bird bath in a quiet spot. Clean it regularly to keep birds safe. Enjoy watching nature come closer to you. Creating your own bird bath saves money and time. Try it and bring life to your outdoor space.


