
Have you ever wanted to draw a TV from a bird’s eye view but didn’t know where to start? Imagine capturing that unique angle that makes your drawing stand out and feel dynamic.
This guide will walk you through each simple step, so you can create a clear and impressive TV sketch from above. By the end, you’ll have the skills to add a fresh perspective to your art and surprise everyone with your new drawing technique.
Ready to see your TV like never before? Let’s dive in!
Credit: medium.com
Materials Needed
Drawing a TV from a bird’s eye view needs some basic tools. These materials help you create clear and accurate sketches.
Gathering the right supplies makes the drawing process smooth and enjoyable. Here are the materials you will need.
Drawing Tools
Use pencils with different hardness to add details and shading. An eraser helps fix mistakes and refine lines.
- HB pencil for basic outlines
- 2B pencil for shading and dark lines
- Sharpener to keep pencils fine
- Soft eraser to remove unwanted marks
Paper And Surface
Choose smooth, white paper to draw clearly. A flat surface helps keep your drawing steady and neat.
| Material | Purpose |
| Drawing paper | Provides a clean surface for your sketch |
| Drawing board | Keeps paper flat and stable |
Measuring And Ruling Tools
Use rulers and templates to draw straight lines and correct shapes. These tools help keep the TV’s proportions right.
- 12-inch ruler for straight edges
- Protractor for angles
- Compass for circles or curves

Credit: www.youtube.com
Setting Up Your Workspace
Drawing a TV from a bird’s eye view needs a clear and organized workspace. This helps you focus and draw accurately.
Prepare your tools and space before you start to make the drawing process easier and faster.
Choose A Clean Surface
Pick a table or desk that is flat and clean. A tidy surface keeps your paper steady and your tools in place.
Make sure the area has enough space for your drawing materials and extra sheets of paper.
Gather Your Drawing Tools
Collect all the items you will need. This saves time and stops you from searching for things later.
- Pencils of different hardness for sketching and detailing
- Eraser for correcting mistakes
- Ruler to draw straight lines
- Sharpener to keep your pencils ready
- Paper or sketchbook for your drawing
Set Proper Lighting
Good lighting helps you see details clearly. Use natural light or a bright desk lamp.
Avoid shadows on your drawing area by placing the light source on the side opposite your drawing hand.
Arrange Reference Materials
Keep any pictures or diagrams of a TV from above nearby. This will guide your drawing and keep it accurate.
Place references where you can see them easily without moving your head too much.
Sketching The Basic Shape
Drawing a TV from a bird’s eye view starts with simple shapes. This helps you get the right angles and proportions.
Focus on the main parts first. This makes the drawing easier to build on later.
Drawing The Rectangle Base
Begin by sketching the rectangle base of the TV. This shows the top frame seen from above.
- Draw a horizontal rectangle to represent the TV’s top surface.
- Use light lines to keep the shape adjustable.
- Check the rectangle’s proportions to match a real TV.
- Add slight perspective by making the far side shorter.
Adding The Screen Outline
Next, add the screen outline inside the base rectangle. This shows where the screen sits on the TV.
| Part | Action |
| Screen edges | Draw a smaller rectangle inside the base |
| Screen corners | Round the corners slightly for realism |
| Screen placement | Center it within the base rectangle |
| Screen size | Keep it smaller than the base by equal margins |

Credit: www.spoak.com
Creating Depth And Perspective
Drawing a TV from a bird’s eye view means showing it from above. This view needs depth and perspective. Depth makes the TV look real and three-dimensional.
Perspective helps objects look smaller as they get farther away. Using perspective rules makes the TV frame look correct from above.
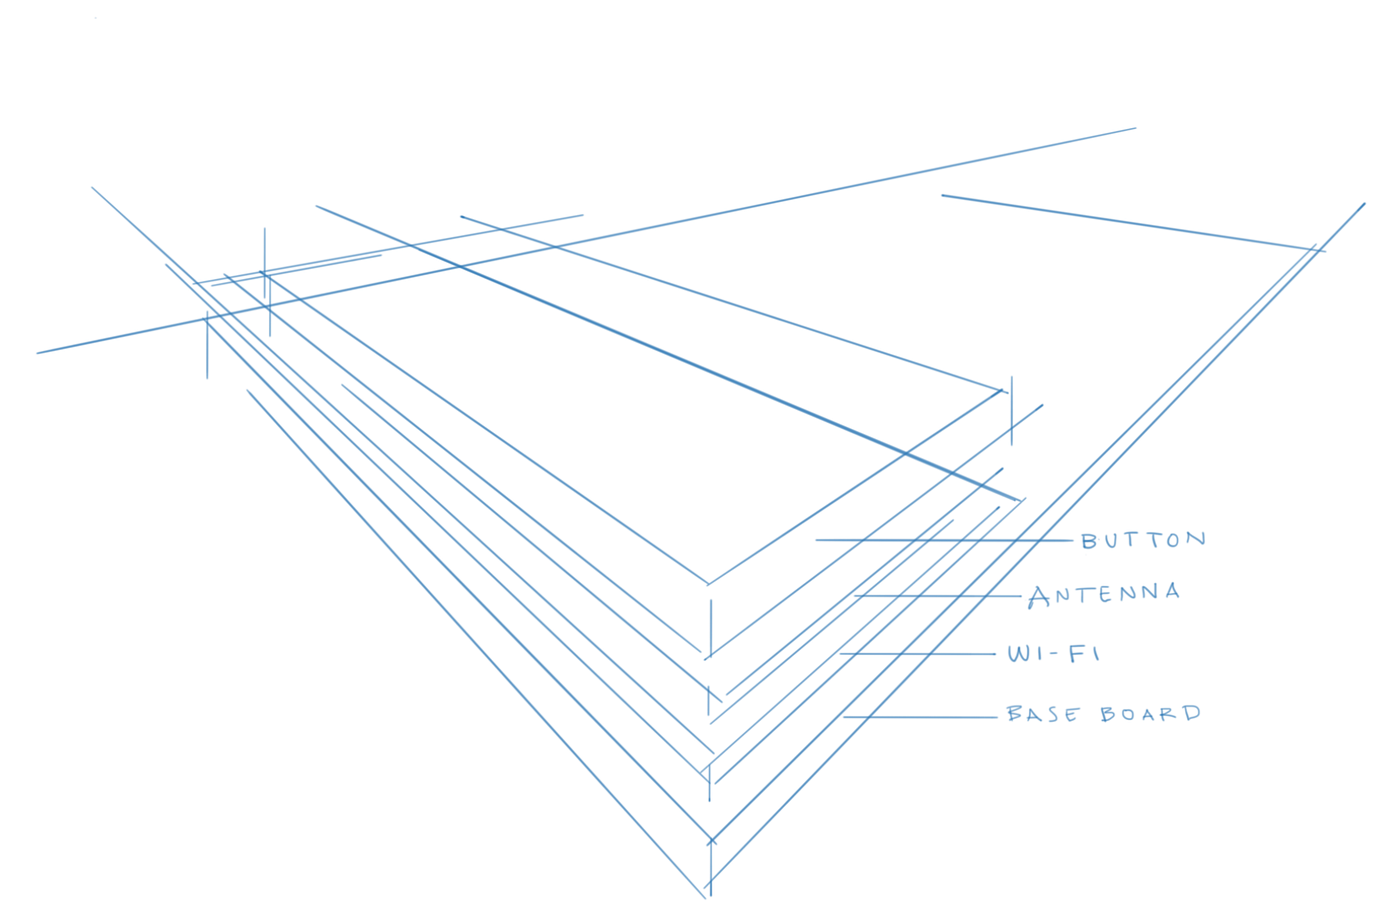
Marking The Vanishing Points
Vanishing points are spots on the horizon where lines seem to meet. For a bird’s eye view, place two vanishing points on your paper. These points guide the TV’s shape in perspective.
Draw a light horizontal line across your paper. Put one vanishing point near the left edge and the other near the right edge. These points will help make the TV look three-dimensional.
- Draw a horizon line near the top of your paper
- Mark two vanishing points far apart on the horizon
- Use these points to guide the TV’s edges
Drawing The Tv Frame In Perspective
Start by drawing the front edge of the TV as a rectangle. Use straight lines to connect the corners to each vanishing point. This creates the sides and top of the TV frame in perspective.
Next, draw the back edges by adding lines that also go toward the vanishing points. This shows the TV’s depth from above. Finish by connecting these lines to form the full frame.
- Draw the front rectangle of the TV
- Connect corners to both vanishing points
- Add back edges using lines to the vanishing points
- Close the shape to complete the frame
Adding Details
Adding details brings your bird’s eye view TV drawing to life. Small parts make the TV look real and interesting.
Focus on the buttons, controls, speakers, and vents. These details show the TV’s function and design.
Buttons And Controls
Draw the buttons and controls on the top or side edges of the TV. Use small rectangles or circles. Place them evenly to keep the design neat.
- Power button near one corner
- Volume controls in a row
- Input selection buttons
- Menu or settings buttons
Speaker And Vent Details
Speakers often appear as small holes or grids on the TV’s frame. Vents can be narrow slits. These details help show the TV’s cooling and sound features.
| Detail | Shape | Position |
| Speaker holes | Small circles | Along bottom edge |
| Vent slits | Narrow rectangles | Near back or sides |
| Sound grill | Grid pattern | Front lower side |
Shading And Texturing
Drawing a TV from a bird’s eye view needs careful shading and texturing. These details make the TV look real and three-dimensional.
Shading shows how light hits the TV and creates shadows. Texturing adds surface details like the smooth screen or rough buttons.
Light Source And Shadows
Identify where the light comes from before shading. The light source changes how shadows fall on the TV.
Shadows help show depth and shape. Darker shadows appear where light is blocked or less strong.
- Place the light source clearly (top-left, top-right, etc.)
- Shade areas farthest from the light darkest
- Add soft shadows for rounded edges
- Use sharper shadows for hard edges like TV corners
Surface Textures
Surface textures show the different materials on the TV. The screen is usually smooth and shiny.
The TV body may have a matte or plastic texture. Use small lines or dots for rough surfaces.
- Use smooth shading for the glass screen
- Add tiny dots or short lines for plastic parts
- Highlight edges to show shine or gloss
- Draw buttons and details with light texture marks
Final Touches
After sketching your TV from a bird’s eye view, focus on refining your drawing. The final touches make your artwork clear and attractive.
Cleaning up lines and highlighting key features bring the TV to life and add depth to your sketch.
Cleaning Lines
Remove any extra or rough sketch lines carefully. Use a fine eraser or a clean digital brush to make the edges smooth and sharp.
- Erase overlapping or unclear lines
- Darken the main outlines for better visibility
- Keep the perspective consistent and neat
- Check for symmetry and correct any mistakes
Highlighting Key Features
Emphasize important parts of the TV, like the screen, buttons, and speaker areas. This helps viewers understand the shape and function.
| Feature | How to Highlight |
| Screen | Add a light reflection or glow effect |
| Buttons | Draw small, clear shapes with shading |
| Speaker Grills | Use dotted or dashed lines to show texture |
| Frame | Darken edges and add small shadows |
Frequently Asked Questions
How Do I Start Drawing A Tv From A Bird’s Eye View?
Begin by sketching the TV’s top rectangle to represent the screen. Add depth by drawing side edges angled downward. Use light lines to map proportions before detailing the frame and buttons for accuracy.
What Tools Are Best For Bird’s Eye View Tv Drawing?
Use pencils for initial sketches and fine liners for detailing. A ruler helps maintain straight edges. Erasers are essential for corrections. Digital tablets with drawing apps also work well for precision.
How Can I Make My Bird’s Eye View Tv Look Realistic?
Focus on accurate perspective and proportions. Add shadows beneath the TV to show depth. Include reflections or slight screen glare for realism. Use clean, consistent lines to enhance the 3D effect.
What Common Mistakes Should I Avoid When Drawing This View?
Avoid incorrect angles that distort perspective. Don’t neglect the TV’s thickness and buttons. Avoid overcrowding details; keep it simple yet clear. Check proportions to ensure the TV looks natural from above.
Conclusion
Drawing a TV from a bird’s eye view can be simple and fun. Start with basic shapes and add details step by step. Keep checking your angles and lines. Practice helps you improve your skills quickly. Soon, your drawings will look clear and realistic.
Try different styles and views to grow your creativity. Enjoy the process and don’t rush. Every sketch brings you closer to your goal. Keep drawing and have fun with your art!


