
Are you ready to give your game a fresh perspective? Creating a birds eye camera in Unity can completely change how players experience your world.
Imagine your players seeing everything from above, making navigation easier and gameplay more engaging. In this guide, you’ll learn simple, step-by-step methods to build a smooth and effective birds eye camera. Whether you’re a beginner or want to improve your skills, this article will help you bring a new dimension to your Unity projects.
Keep reading, and you’ll have your camera set up in no time!

Credit: medium.com
Setting Up Your Unity Project
Setting up your Unity project correctly lays a solid foundation for creating a smooth and efficient bird’s eye camera. Taking a few moments to organize your workspace and bring in the right tools saves you time and frustration later. Are you ready to create a clean environment that supports your development process?
Creating A New Project
Start by opening Unity Hub and clicking on the “New Project” button. Choose the 3D template since a bird’s eye camera typically operates in a three-dimensional space. Name your project something clear and descriptive, like BirdsEyeCameraDemo, so you can easily find it later.
Set the project location to a folder you can quickly access. Avoid deeply nested directories to prevent path length issues. Once you click “Create,” Unity will generate the basic files and open your new scene.
Importing Essential Assets
Next, you’ll need to add assets that help you build and test your camera. The Standard Assets package from Unity is a great starting point because it includes useful scripts and prefabs.
To import these, go to the Unity Asset Store tab inside the editor, search for “Standard Assets,” and click “Download” then “Import.” Select only the assets relevant to your project to keep it lightweight. For a bird’s eye camera, focus on scripts related to camera control and any sample environments for quick testing.
Additionally, consider importing free terrain or environment assets to give your camera something to look at. This makes testing feel more realistic and helps you fine-tune camera angles effectively. Have you thought about how your camera’s perspective will interact with the world you create?
Credit: medium.com
Configuring The Scene
Configuring the scene is a key step in creating a bird’s eye camera in Unity. This setup shapes the player’s view and interaction with the game world. Careful placement of terrain and objects creates a clear, immersive environment. Positioning the main character correctly ensures smooth gameplay and camera tracking.
Adding Terrain And Objects
Start by creating the terrain using Unity’s Terrain tools. Choose a flat or slightly varied surface to fit your game style. Use textures to add grass, dirt, or stone for realism. Place trees, rocks, and buildings to make the scene lively but not cluttered.
- Open the Terrain editor in Unity.
- Select terrain size and height.
- Paint textures and details.
- Drag and drop objects from the asset folder.
- Use simple objects for better performance.
Keep the scene balanced. Avoid placing too many objects close together. This helps the camera capture the whole area clearly.
Positioning The Main Character
Place the main character at the center of the terrain. This spot allows the camera to follow the player easily. Adjust the character’s height so it stands naturally on the ground. Check the character’s rotation to face the correct direction.
- Select the player object in the hierarchy.
- Set the position coordinates (X, Y, Z) for the center area.
- Make sure the character’s feet touch the terrain.
- Test moving the character to confirm smooth navigation.
Good positioning reduces camera jitter and keeps the gameplay clear. The bird’s eye camera should always show the character and nearby surroundings.
Creating The Birds Eye Camera
Creating a birds eye camera in Unity gives your game a clear top-down view. This view helps players see the entire scene from above. Setting up this camera involves adding a new camera and adjusting its position and angle. Each step ensures the camera captures the best perspective for gameplay.
Adding A New Camera
Start by opening your Unity project. In the Hierarchy window, right-click and select Camerafrom the menu. This action adds a new camera to your scene. Rename it to something like BirdsEyeCamerafor easy identification.
Disable or move the main camera if you want only the birds eye view. The new camera will be the one showing the top-down perspective. Setting up this separate camera allows you to control the view without affecting other cameras.
Adjusting Camera Angle And Height
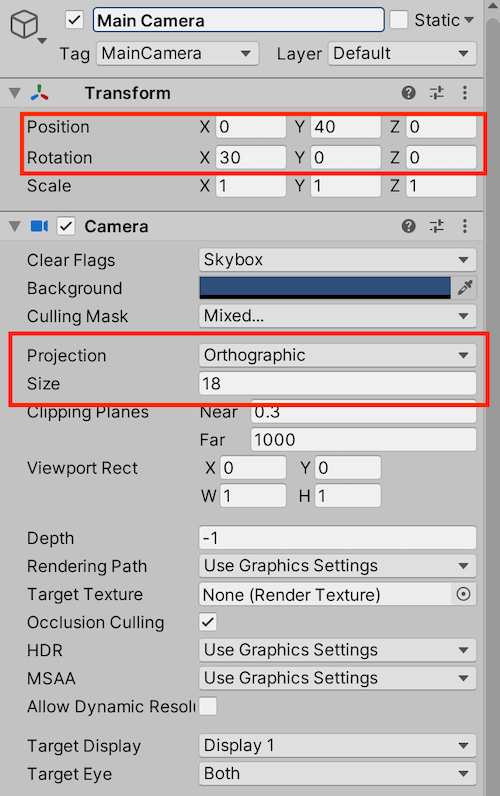
Select the new birds eye camera in the Hierarchy. In the Inspector, set its position high above the game objects. Use the Y-axis to raise the camera to the desired height. A height between 20 and 50 units usually works well.
Next, rotate the camera to look straight down. Set the X rotation to 90 degrees. This adjustment aligns the camera lens perpendicular to the ground. It captures a clear overhead view of the entire scene.
Adjust the camera’s field of view or orthographic size for better framing. Orthographic mode is ideal for a flat, 2D-like birds eye view. You can switch this in the camera’s settings by checking the Orthographicbox.
Implementing Camera Controls
Implementing camera controls is key to creating a smooth and intuitive birds eye view in Unity. You want your camera to move naturally and respond well to user inputs. This keeps players engaged and helps them explore your scene with ease.
Setting Up Camera Movement
Start by attaching a simple script to your camera to handle movement along the X and Z axes. Use Unity’s Input.GetAxis(“Horizontal”) and Input.GetAxis(“Vertical”) to read keyboard input, allowing the camera to pan left, right, forward, and backward.
Here’s a quick example:
float moveSpeed = 10f; float horizontal = Input.GetAxis("Horizontal"); float vertical = Input.GetAxis("Vertical"); Vector3 direction = new Vector3(horizontal, 0, vertical); transform.position += direction moveSpeed Time.deltaTime; This lets you move the camera smoothly across the scene. Try tweaking moveSpeedto find the right balance between fast and controllable movement. Don’t forget to clamp the camera’s position if your map has edges you don’t want the camera to cross.
Adding Zoom Functionality
Zooming enhances the birds eye experience by letting users get closer or farther from the action. Use the mouse scroll wheel input (Input.GetAxis(“Mouse ScrollWheel”)) to control zoom level.
Adjust the camera’s height or field of view based on scroll input. For example, modify the camera’s Y position like this:
float zoomSpeed = 20f; float minZoom = 10f; float maxZoom = 50f; float scroll = Input.GetAxis("Mouse ScrollWheel"); Vector3 pos = transform.position; pos.y -= scroll zoomSpeed; pos.y = Mathf.Clamp(pos.y, minZoom, maxZoom); transform.position = pos; Remember to clamp zoom values to avoid awkward angles or clipping through objects. Experiment with zoomSpeed to keep zooming responsive without feeling jumpy. Have you noticed how subtle zoom adjustments can dramatically improve navigation?
Optimizing Camera Performance
Optimizing camera performance is essential to ensure your bird’s eye view runs smoothly without draining system resources. A well-optimized camera not only improves visual quality but also keeps the game responsive and enjoyable. Let’s look at key ways you can manage your camera’s settings to boost performance effectively.
Managing Camera Clipping
Camera clipping controls what objects are visible based on their distance from the camera. Setting the near and far clipping planes too wide can cause unnecessary rendering of distant or close objects, hurting performance.
Try narrowing the clipping planes to just cover the area your player needs to see. For example, if your bird’s eye camera only needs to view objects within 50 units, set your far clipping plane accordingly.
Check your camera’s Near Clip Planeas well—too close can cause visual glitches, too far can hide nearby objects. Fine-tuning these values saves rendering time and reduces overdraw.
Improving Frame Rate
Frame rate directly affects how smooth your game feels. A stable frame rate of 60 FPS or higher is ideal for most games, but if your camera setup is heavy, it can drop significantly.
Here’s what you can do to improve frame rate:
- Limit the camera’s viewport:Reduce the screen area the camera renders if possible.
- Use culling masks:Exclude unnecessary layers from rendering to lighten the load.
- Optimize shadows and lighting:Shadows can be expensive; turn them off or reduce their resolution for distant objects.
- Lower the camera’s render resolution:Rendering at a lower resolution and upscaling can boost performance without a major hit to visuals.
Ask yourself: Are all objects visible to the camera truly necessary at all times? Sometimes, hiding or simplifying distant objects can free up valuable resources.
In my experience, adjusting culling masks alone gave a noticeable boost without changing the scene’s look much. Experiment with these settings to find your sweet spot between quality and speed.
Credit: medium.com
Testing And Debugging
Creating a bird’s eye camera in Unity requires careful testing and debugging. Check the camera’s position and ensure it captures the desired view. Adjust scripts to maintain smooth movement and correct any errors in the code for optimal performance.
Testing and debugging are vital stages in creating a birds-eye camera in Unity. Once you’ve set up your camera, you want to ensure it operates smoothly and as expected. This is where testing comes into play. Debugging helps you identify and fix any issues that might prevent your camera from functioning optimally.Running The Scene
To test your birds-eye camera, start by running the scene in Unity. Use the play button at the top of the Unity interface. As the scene runs, observe how the camera behaves. Does it follow the player character or object as intended? Move your player or object around the scene to see if the camera maintains the correct perspective. If you notice any lag or jitter, make note of these issues for debugging.Troubleshooting Common Issues
Encountering problems is part of the process. A common issue is the camera not following the target smoothly. Check the code attached to your camera for any discrepancies. Another frequent problem is incorrect camera angles. Ensure your camera’s position is set correctly in the Unity inspector. Adjust the camera’s height and angle to achieve the desired birds-eye view. If the camera fails to render certain objects, review your camera’s culling settings. Are they excluding important layers? Finally, ask yourself—how can you optimize the camera’s performance? Sometimes, tweaking the camera’s field of view or movement speed can make a significant difference.Frequently Asked Questions
What Is A Birds Eye Camera In Unity?
A birds eye camera shows a top-down view of the game scene. It helps players see the environment clearly. In Unity, it’s created by positioning the camera above the scene, looking straight down.
How Do I Set Up Birds Eye Camera In Unity?
Place the camera high above the scene. Rotate it to look directly downward. Adjust the orthographic size or field of view for a clear top-down view.
Can Birds Eye Camera Improve Gameplay Experience?
Yes, it offers better visibility of the game area. Players can easily navigate and strategize. This perspective is popular in strategy and simulation games.
How To Control Birds Eye Camera Movement In Unity?
Use scripts to move the camera based on player input. Common controls include panning, zooming, and rotating. This enhances player interaction and flexibility.
Conclusion
Creating a birds eye camera in Unity is simple and useful. You control the camera’s position and angle easily. This view helps players see the whole scene clearly. You can adjust settings to fit your game style. Practice these steps to improve your skills.
Try adding your own features next time. This method works well for many game types. Keep experimenting to make your game better. Now, you are ready to create your own bird’s eye view.


