
If you love watching birds up close, your Bird Buddy Camera is a fantastic tool. But what happens when the battery runs low?
Knowing exactly how to charge your Bird Buddy Camera quickly and safely means you never miss a single feathered visitor. In this guide, you’ll discover simple steps to keep your camera powered up and ready to capture every moment. Keep reading to make sure your Bird Buddy stays charged and your birdwatching experience stays uninterrupted.

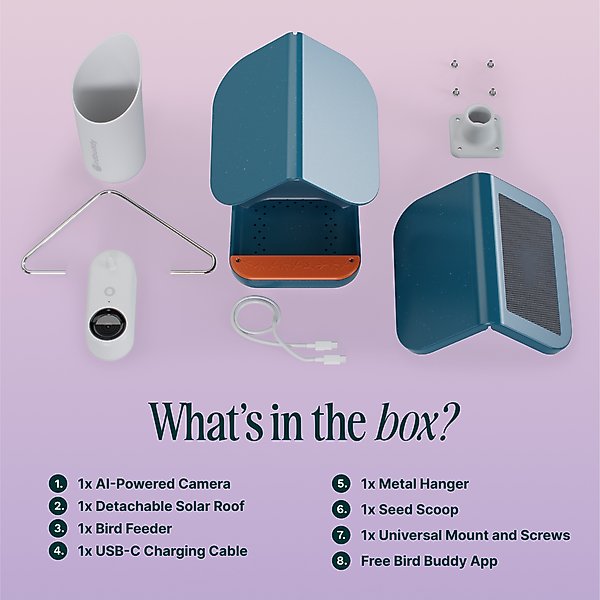
Credit: support.mybirdbuddy.com
Bird Buddy Camera Features
The Bird Buddy Camera offers features designed for easy use and long-lasting performance. Its thoughtful design ensures birdwatchers enjoy clear images without frequent interruptions. Charging the camera is simple, thanks to its smart battery and port placement. Understanding these features helps maintain your camera efficiently and enjoy uninterrupted bird monitoring.
Battery Specifications
The Bird Buddy Camera uses a rechargeable lithium-ion battery. This battery provides several hours of continuous use. It offers stable power for crisp photos and video. The battery capacity supports extended birdwatching sessions outdoors. It charges quickly and holds power well over time. The camera alerts users when the battery is low.
Charging Port Location
The charging port is easy to find and access. It is located at the bottom of the camera. This placement keeps the port safe from weather damage. The port fits a standard USB-C cable for fast charging. Users can charge the camera without removing it from its mount. The design prevents dirt or moisture from entering the port.
Preparing For Charging
Preparing your Bird Buddy Camera for charging ensures a smooth and safe process. Taking the right steps before plugging in the device helps protect the battery and extends its life. Simple preparations make charging easier and more efficient.
Gathering Necessary Accessories
Collect all items needed for charging the Bird Buddy Camera. This includes:
- The original charging cable provided with the camera
- A compatible power adapter or USB port
- Optional: A power bank for charging on the go
Using the correct accessories prevents damage and ensures proper charging speed.
Ensuring Proper Environment
Choose a clean and dry area to charge the camera. Avoid places with:
- High humidity or moisture
- Direct sunlight or extreme heat
- Dust or dirt that could enter charging ports
Keep the camera stable on a flat surface during charging. This helps maintain good contact and prevents interruptions.
Step-by-step Charging Process
Charging your Bird Buddy Camera is simple and straightforward if you follow the right steps. Understanding the process ensures your device stays powered and ready to capture every bird sighting without interruption. Let’s break down how you can charge your camera efficiently.
Connecting The Charger
Start by locating the charging port on your Bird Buddy Camera. It’s usually at the base or side, designed for easy access. Use the original charging cable that came with the device to avoid compatibility issues.
Plug the charger into a power outlet first, then connect the cable to your camera. This order helps prevent any electrical surges that might harm the device. If you notice resistance when inserting the charger, check the port and cable for debris or damage.
Monitoring Charging Status
Once connected, your camera will indicate it’s charging, often through a small LED light or an on-screen icon. Keep an eye on this indicator to confirm that power is flowing correctly.
Some Bird Buddy models display a battery percentage, making it easier to track progress. If your camera isn’t showing any sign of charging, unplug and reconnect the charger, or try a different power source. This simple check can save you from unexpected battery drain during birdwatching.
Estimated Charging Time
Charging time varies depending on your camera model and the battery level. Typically, a full charge takes between 2 to 4 hours. Planning ahead is key—start charging your camera well before your next birdwatching session.
Keep in mind that using the camera while charging might extend the time needed to reach full battery. Have you ever been caught with a dead camera just when a rare bird appeared? Avoid that by charging your device overnight or during breaks in your day.
Credit: www.chewy.com
Tips For Faster Charging
Charging your Bird Buddy Camera quickly can save you a lot of waiting time, especially when you’re eager to capture those perfect bird moments. Small changes in how you charge can make a big difference in speed. Here are practical tips to help you get your camera powered up faster.
Using Compatible Chargers
Not all chargers deliver the same power. Using the charger that came with your Bird Buddy Camera or one with the correct output specifications ensures efficient charging.
Look for chargers with a USB-C port and at least 5V/2A output. Chargers designed for smartphones or tablets often work well because they provide enough current to speed up charging.
I once tried charging my camera with a low-power charger from an old device, and it took twice as long. Using a compatible charger cut the time in half, proving the difference is real.
Avoiding Usage During Charging
Using your Bird Buddy Camera while it’s charging can slow down the process significantly. The device draws power for both operation and charging, which means less energy goes into the battery.
Try to keep the camera off or in standby mode during charging. This simple habit can reduce charging time noticeably.
Think about it: do you really need to check the camera’s footage or settings while it’s charging? Waiting until it’s fully charged can give you a faster and more efficient experience.
Troubleshooting Charging Issues
Charging issues with your Bird Buddy Camera can be frustrating, especially when you rely on it to capture those perfect bird moments. Understanding common problems and how to solve them can save you time and keep your camera ready to use. Let’s take a closer look at what might go wrong and how you can fix it quickly.
Common Charging Problems
- Camera not charging at all:Sometimes the camera shows no sign of charging despite being plugged in.
- Slow charging:The battery takes much longer than usual to charge fully.
- Intermittent charging:Charging starts but stops unexpectedly or the camera disconnects from the charger.
- Overheating while charging:The camera or charger becomes unusually hot during the process.
- Charger or cable issues:Using incompatible or damaged charging accessories can cause problems.
Solutions And Workarounds
- Check the charging cable and adapter:Use the original cable and adapter that came with your Bird Buddy Camera. Inspect for any damage or wear. If you don’t have the original, try a high-quality replacement that meets the same specifications.
- Clean the charging port:Dust or debris inside the charging port can prevent proper connection. Use a soft brush or compressed air to gently clean it.
- Try different power sources:Plug the charger into a different outlet or USB port. Avoid USB hubs or low-power ports that may not supply enough current.
- Restart the camera:Sometimes, a simple restart can reset the charging system. Turn off your camera, wait for a few seconds, and turn it back on before charging again.
- Avoid extreme temperatures:Charging in very hot or cold environments can affect battery performance. Charge your camera in a room-temperature area.
- Update firmware:Check if your Bird Buddy Camera has a firmware update. Sometimes charging issues are fixed through software improvements.
- Monitor charging behavior:If the camera overheats or charging stops frequently, unplug immediately to avoid damage and contact Bird Buddy support.
Have you noticed any specific patterns when your camera refuses to charge? Sometimes, observing when the problem occurs can lead you to a simple fix. Don’t let charging issues keep you from enjoying your Bird Buddy’s amazing features.
Maintaining Battery Health
Charging your Bird Buddy Camera correctly can prolong battery life. Use the original charger and avoid overcharging. Disconnect it once fully charged to prevent overheating.
Maintaining the battery health of your Bird Buddy Camera ensures long-lasting performance. Proper care and attention can extend the battery life significantly. Let’s explore key practices to keep your device charged and ready.Charging Best Practices
Charge your Bird Buddy Camera with the original charger. This prevents overloading the battery. Avoid using third-party chargers, as they may damage the battery. Charge the device at moderate room temperatures. Extreme temperatures can harm the battery cells. Remove the charger once the battery reaches full capacity. Overcharging can reduce battery lifespan.Storage Recommendations
Store your Bird Buddy Camera in a cool, dry place. High humidity can affect battery performance. If storing for long periods, keep the battery at 50% charge. This maintains battery health during inactivity. Avoid exposing the camera to direct sunlight. Sunlight can cause overheating and battery damage. Regularly check and recharge the battery. This ensures it remains functional and ready for use.:max_bytes(150000):strip_icc()/bird-feeder-with-camera-f5a327fa34d746f5beeacd7a48eb9021.jpg)
Credit: www.realsimple.com
Frequently Asked Questions
How Do I Charge The Bird Buddy Camera?
To charge the Bird Buddy camera, connect the included USB cable to the camera’s charging port. Plug the other end into a power source. Charging typically takes 2-3 hours for a full battery. Always use the original cable for optimal performance.
Can I Use Any Charger For Bird Buddy Camera?
It’s best to use the original charger provided with the Bird Buddy camera. Using non-compatible chargers may damage the battery or reduce charging efficiency. Always check the output voltage and current match the camera’s requirements to ensure safe and fast charging.
How Long Does Bird Buddy Camera Battery Last?
The Bird Buddy camera battery lasts approximately 7-10 days on a full charge with typical usage. Battery life varies based on usage frequency and environmental factors. Regular charging ensures uninterrupted operation and optimal performance for your bird-watching sessions.
What Indicates The Bird Buddy Camera Is Fully Charged?
The Bird Buddy camera’s LED indicator shows charging status. A red light means charging is in progress. When the light turns green or turns off, the battery is fully charged. Avoid overcharging to maintain battery health and longevity.
Conclusion
Charging your Bird Buddy Camera is simple and quick. Use the original charger for the best results. Keep the camera dry and clean while charging. Make sure the charging port is free from dust. Charge fully before your next birdwatching session.
This keeps your camera ready to capture every moment. Regular charging extends battery life and improves performance. Enjoy watching birds without interruptions by charging properly. Stay prepared, and your Bird Buddy Camera will always work well.


