
Have you ever struggled to draw stairs from a bird’s eye view and felt stuck on where to start? You’re not alone.
Drawing stairs from above can seem tricky, but once you learn the simple steps, it becomes much easier. In this guide, you’ll discover clear, easy-to-follow tips that will help you create accurate and realistic stairs from a top-down perspective. By the end, you’ll have the confidence to sketch stairs that look professional and add depth to your designs.
Ready to transform your drawing skills? Let’s dive in.
Materials Needed
To draw stairs from a bird’s eye view, you need some basic materials. These tools help you create accurate and neat drawings.
Gathering the right materials first makes the drawing process easier and more precise.
Drawing Tools
You need simple drawing tools to start your sketch. These tools help you make clean lines and correct mistakes.
- Pencils (preferably HB and 2B for different line darkness)
- Eraser to fix errors
- Ruler for straight lines
- Protractor to measure angles
- Sharpener to keep pencil tips fine
Paper Types
Choosing the right paper affects your drawing quality. Use paper that holds pencil marks well and does not tear easily.
- Sketching paper for practice
- Drawing paper with smooth texture for final work
- Grid paper to help with measurements
Measuring And Layout Tools
Accurate measurements help you draw stairs that look correct from above. Use these tools to get exact dimensions.
| Tool | Use |
| Scale ruler | Measure and draw stairs to scale |
| Set squares | Draw perfect right angles |
| Compass | Draw arcs or circles if needed |

Credit: www.youtube.com
Basic Stair Shapes
Drawing stairs from a bird’s eye view helps show their layout clearly. This view looks straight down on the stairs. It shows the shape and direction of each stair type.
Two common stair shapes are rectangular and spiral. Each shape has a simple way to draw it from above. Let’s look at how to draw each one.
Rectangular Stairs
Rectangular stairs have straight steps and right angles. They look like a series of rectangles stacked in a line. You can draw them by showing each step as a smaller rectangle inside a larger one.
- Start with a large rectangle to show the stair area.
- Divide it into equal smaller rectangles to show each step.
- Draw the steps in a straight line or with a landing in between.
- Use parallel lines to show the edges of each step.
Spiral Stairs
Spiral stairs curve around a center point. From above, they look like a circle with steps radiating out. Each step is a wedge shape that fits around the center pole.
| Step | Shape | Description |
| 1 | Wedge | Starts narrow at the center pole and widens outward. |
| 2 | Curved edge | Outer edge of the step forms part of a circle. |
| 3 | Radiating lines | Lines from center show the division between steps. |
Setting Up The Drawing Space
Before drawing stairs from a bird’s eye view, prepare your workspace. A clean, well-lit area helps you focus on details.
Organize your tools and choose the right materials to make the process easier and more accurate.
Choosing The Paper Size
Select paper that fits the size of the staircase you want to draw. Larger paper allows more detail and space for measurements.
- Use A3 or larger for complex stair designs
- A4 paper works for simple or small stairs
- Choose heavyweight paper to avoid wrinkling
- Consider using grid or plain paper depending on your comfort
Marking The Scale
Scaling helps you fit the stairs on paper while keeping correct proportions. Decide the scale before drawing.
| Scale | Meaning | Use Case |
| 1:10 | 1 cm = 10 cm real size | Small staircases |
| 1:20 | 1 cm = 20 cm real size | Medium staircases |
| 1:50 | 1 cm = 50 cm real size | Large staircases |

Credit: www.youtube.com
Drawing The Stair Outline
Drawing stairs from a bird’s eye view starts with the outline. This shape shows the overall stair design and guides the details.
Focus on the basic form first. It helps to plan the stair’s size and position clearly before adding steps or landings.
Sketching The Flight
Begin by drawing the flight of stairs as a long rectangle or trapezoid, depending on the stair shape. This block represents the main set of steps.
- Draw a straight line for the stair direction.
- Mark the start and end points of the stairs.
- Connect these points with parallel lines to form the stair flight outline.
- Keep the width consistent with typical stair dimensions.
- Use light pencil marks to adjust the shape easily.
Adding Landings
Landings are flat platforms between flights. They change the stair direction and provide rest spaces.
| Landing Shape | Description | When to Use |
| Square | Simple and common shape | At turns or breaks |
| Rectangular | Longer platform for wide stairs | Between flights in large staircases |
| Polygonal | Irregular shape for unique designs | In custom stair layouts |
Adding Details
Adding details makes your bird’s eye view of stairs look real and clear. Details help show how the stairs are built.
Focus on the small parts like risers and treads. These parts give the stairs shape and depth in your drawing.
Drawing Steps
Start by drawing the outline of each step. Make sure the shape matches the style of your stairs.
- Draw the front edge of each step as a straight line.
- Connect each line with parallel lines to show the step depth.
- Repeat the shape for all steps in the stair flight.
- Check that all steps align properly in your drawing.
Marking Risers And Treads
Risers are the vertical parts between steps. Treads are the flat parts where you place your feet. Marking these clearly helps viewers understand the stairs.
| Part | Description | How to Draw |
| Riser | Vertical face between steps | Draw a thin rectangle between each tread line |
| Tread | Horizontal surface to step on | Draw a wide rectangle for each step surface |
Use light lines for risers and darker lines for treads. This contrast helps show depth clearly in your bird’s eye view.
Credit: www.youtube.com
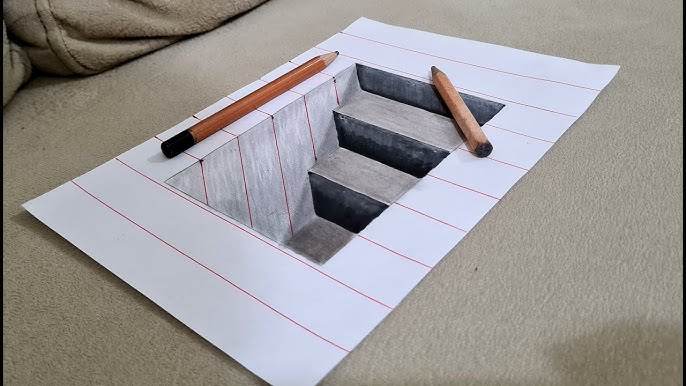
Shading And Texturing
Shading and texturing give stairs a realistic look in a bird’s eye view drawing. They help show the stairs’ shape and surface details clearly. Using light and dark tones creates a sense of depth.
In this guide, we focus on two important techniques: creating depth and highlighting edges. These help your stairs stand out and look three-dimensional.
Creating Depth
Depth makes your stairs look like they rise or fall in space. Use shading to show which parts are closer or farther. Darker shading usually means the part is deeper or in shadow.
- Start by identifying the light source direction.
- Shade the steps opposite the light with darker tones.
- Use lighter shading on the top surfaces facing the light.
- Blend the tones smoothly to avoid harsh lines.
- Add shadows below the stairs to ground them visually.
Highlighting Edges
Edges define the shape of the stairs. Highlighting them helps separate one step from another. Use clear lines and slight brightness on edges facing the light.
| Edge Type | Shading Technique | Effect |
|---|---|---|
| Top Edge | Light highlight with thin white or light grey line | Makes steps look crisp and sharp |
| Side Edge | Darker shading with soft gradient | Adds depth and dimension |
| Shadow Edge | Dark shadow close to the edge | Shows where light is blocked |
Common Mistakes To Avoid
Drawing stairs from a bird’s eye view can be tricky. Many beginners make simple mistakes that change the look of the stairs.
Avoid these errors to make your drawing clear and accurate. This will help others understand your design better.
Ignoring Stair Direction
One common mistake is not showing the correct stair direction. Stairs should clearly show which way they go up or down.
Without this, the drawing can confuse the viewer about the stair flow and design.
Incorrect Step Proportions
Steps that are too wide or too narrow can make the stairs look odd. Keep the step width and height consistent.
Proper proportions help the stairs appear realistic and easy to use.
Missing Landing Areas
Landings are flat areas between stair flights. Many drawings forget to add them, which is a big error.
Landings give space to rest and change direction. Always include them if your stairs turn or change levels.
Overcrowding The Stairs
Adding too many steps in a small space makes the drawing look messy and confusing.
Keep the stair design simple and clear. Use enough space to show each step distinctly.
Forgetting The Handrails
Handrails provide safety and structure. Leaving them out can make your drawing incomplete.
Add handrails along the stairs and landings to show a full, safe design.
Not Using Clear Lines For Steps
Steps need clear, distinct lines to separate each one. Blurred or missing lines confuse the viewer.
Draw each step with a clean line to show the stair shape clearly.
Tips For Practice
Drawing stairs from a bird’s eye view can seem tricky at first. Practice helps you understand shapes and angles better.
Use simple tips to improve your drawing skills. These tips make the process easier and more fun.
Start With Basic Shapes
Begin your drawing using simple shapes like rectangles and squares. These shapes form the steps and landings.
Keep your shapes even and aligned to create a clear structure for the stairs.
Use Light Pencil Lines
Draw with light pencil lines first. This allows you to erase and adjust your stairs easily.
Once you are happy with the shape, darken the lines for a clean look.
Practice Perspective
Bird’s eye view means looking down from above. Practice drawing stairs as if you are looking from the top.
Focus on how the steps get smaller as they go farther away. This helps create depth in your drawing.
Draw Different Stair Designs
Try drawing straight, curved, and spiral stairs. Each type has unique shapes and patterns.
Experimenting with designs improves your ability to draw stairs in many styles.
Use Reference Images
Look at photos or drawings of stairs from above. They help you see real shapes and details.
Try copying these images to practice your observation and drawing skills.
Keep Your Steps Even
Make sure each step has the same size and shape. This keeps your stairs looking neat and realistic.
Use a ruler or a grid to help keep your lines straight and even.
Practice Regularly
Draw stairs every day or several times a week. Regular practice improves your skills faster.
Keep your old drawings to see your progress over time.
Frequently Asked Questions
How Do You Start Drawing Stairs From Above?
Begin by sketching a rectangle to represent the stairwell’s boundary. Divide it into equal segments for steps. Use parallel lines to depict the tread and riser. Ensure perspective consistency, maintaining vanishing points for a realistic bird’s-eye view.
What Tools Are Best For Drawing Stairs?
Using a ruler ensures precise lines and angles. Graph paper helps maintain proportionality and perspective. Pencils allow for easy corrections. Digital tools like drawing software can enhance precision and offer layering options for complex designs.
How Can Perspective Affect Stair Drawings?
Perspective determines how stairs are viewed from above. A consistent vanishing point ensures realism. Misalignment can distort the drawing, making stairs appear uneven or skewed. Proper perspective guides how the steps recede, enhancing depth perception.
Are There Tips For Adding Detail To Stairs?
Incorporate shadows to highlight depth and dimension. Use varied line thickness for emphasis. Texture adds realism, like wood grain or tile patterns. Detailing railings and balusters enhances authenticity and visual interest in your stair drawing.
Conclusion
Drawing stairs from a bird’s eye view is simple with practice. Start with clear steps and keep shapes neat. Use lines to show each stair’s depth and direction. Check your angles to make the stairs look real. Take your time and adjust as needed.
Soon, your drawings will look natural and easy to understand. Keep practicing, and enjoy creating your stair designs!


