
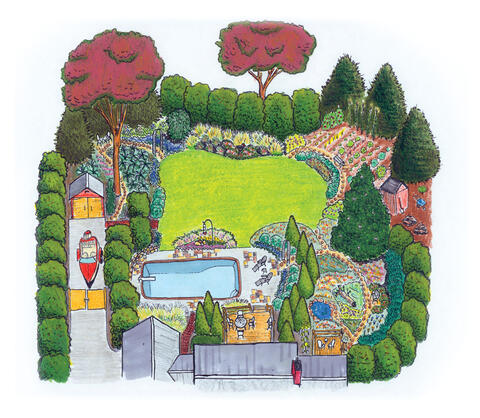
Have you ever wanted to capture a whole landscape in one drawing, as if you were looking down from the sky? Learning how to draw a bird’s eye view of a landscape can help you do just that.
This skill lets you see the big picture and show every detail from above, making your artwork more exciting and unique. In this guide, you’ll discover simple steps and tips to create your own stunning top-down landscape. Get ready to transform your ideas into drawings that truly stand out.
Keep reading—you’re about to unlock a new way of seeing and drawing the world around you.
Credit: extension.msstate.edu
Tools And Materials Needed
Drawing a bird’s eye view of a landscape needs specific tools. These help you create clear and detailed sketches.
Some tools are basic and essential. Others are digital and optional but useful for fine details.
Essential Drawing Supplies
Start with the basics to make your landscape drawing accurate and neat. These supplies form the foundation of your work.
- Pencils in various hardness (HB, 2B, 4B)
- Good quality eraser for clean corrections
- Ruler or straightedge to draw clean lines
- Sketchbook or drawing paper with smooth texture
- Fine tip pens for outlining details
- Colored pencils or markers for adding color
- Compass for drawing circles and curves
Optional Digital Tools
Digital tools can improve your workflow and add effects. They are not required but can help refine your drawing.
| Tool | Purpose |
| Graphic Tablet | Draw directly on the screen with a stylus |
| Drawing Software | Edit and color your sketches digitally |
| Scanner | Convert paper drawings into digital format |
| Photo Editing App | Adjust brightness, contrast, and details |
Basics Of Bird’s Eye View
A bird’s eye view shows a scene from above. It looks like you are flying over the landscape.
This view helps you see how different parts of the land connect. It is useful for maps and drawings.
Perspective And Scale
Perspective means how far or close objects appear in your drawing. In bird’s eye view, you see tops of objects.
Scale is the size of objects compared to each other. Keep the scale consistent to make the drawing clear.
- Use smaller shapes for distant objects
- Keep trees, buildings, and roads in correct size relation
- Use a ruler or grid to keep scale even
Common Mistakes To Avoid
Many beginners forget to keep the scale right. This makes objects look strange or out of place.
Another mistake is mixing side view with bird’s eye view. This breaks the perspective and confuses the viewer.
- Do not draw objects from the side in a top-down view
- Avoid changing scale for no reason
- Do not crowd objects too close together
Planning Your Landscape Layout
Drawing a bird’s eye view of a landscape starts with a clear plan. Planning helps you place objects in the right spots.
Good planning saves time and makes your drawing look balanced and interesting.
Choosing The Scene
Pick the area you want to draw from above. It can be a park, garden, or neighborhood.
Think about what features you want to include, such as trees, paths, or water bodies.
- Decide on a small or large area
- Include key landmarks for reference
- Choose a clear and simple scene
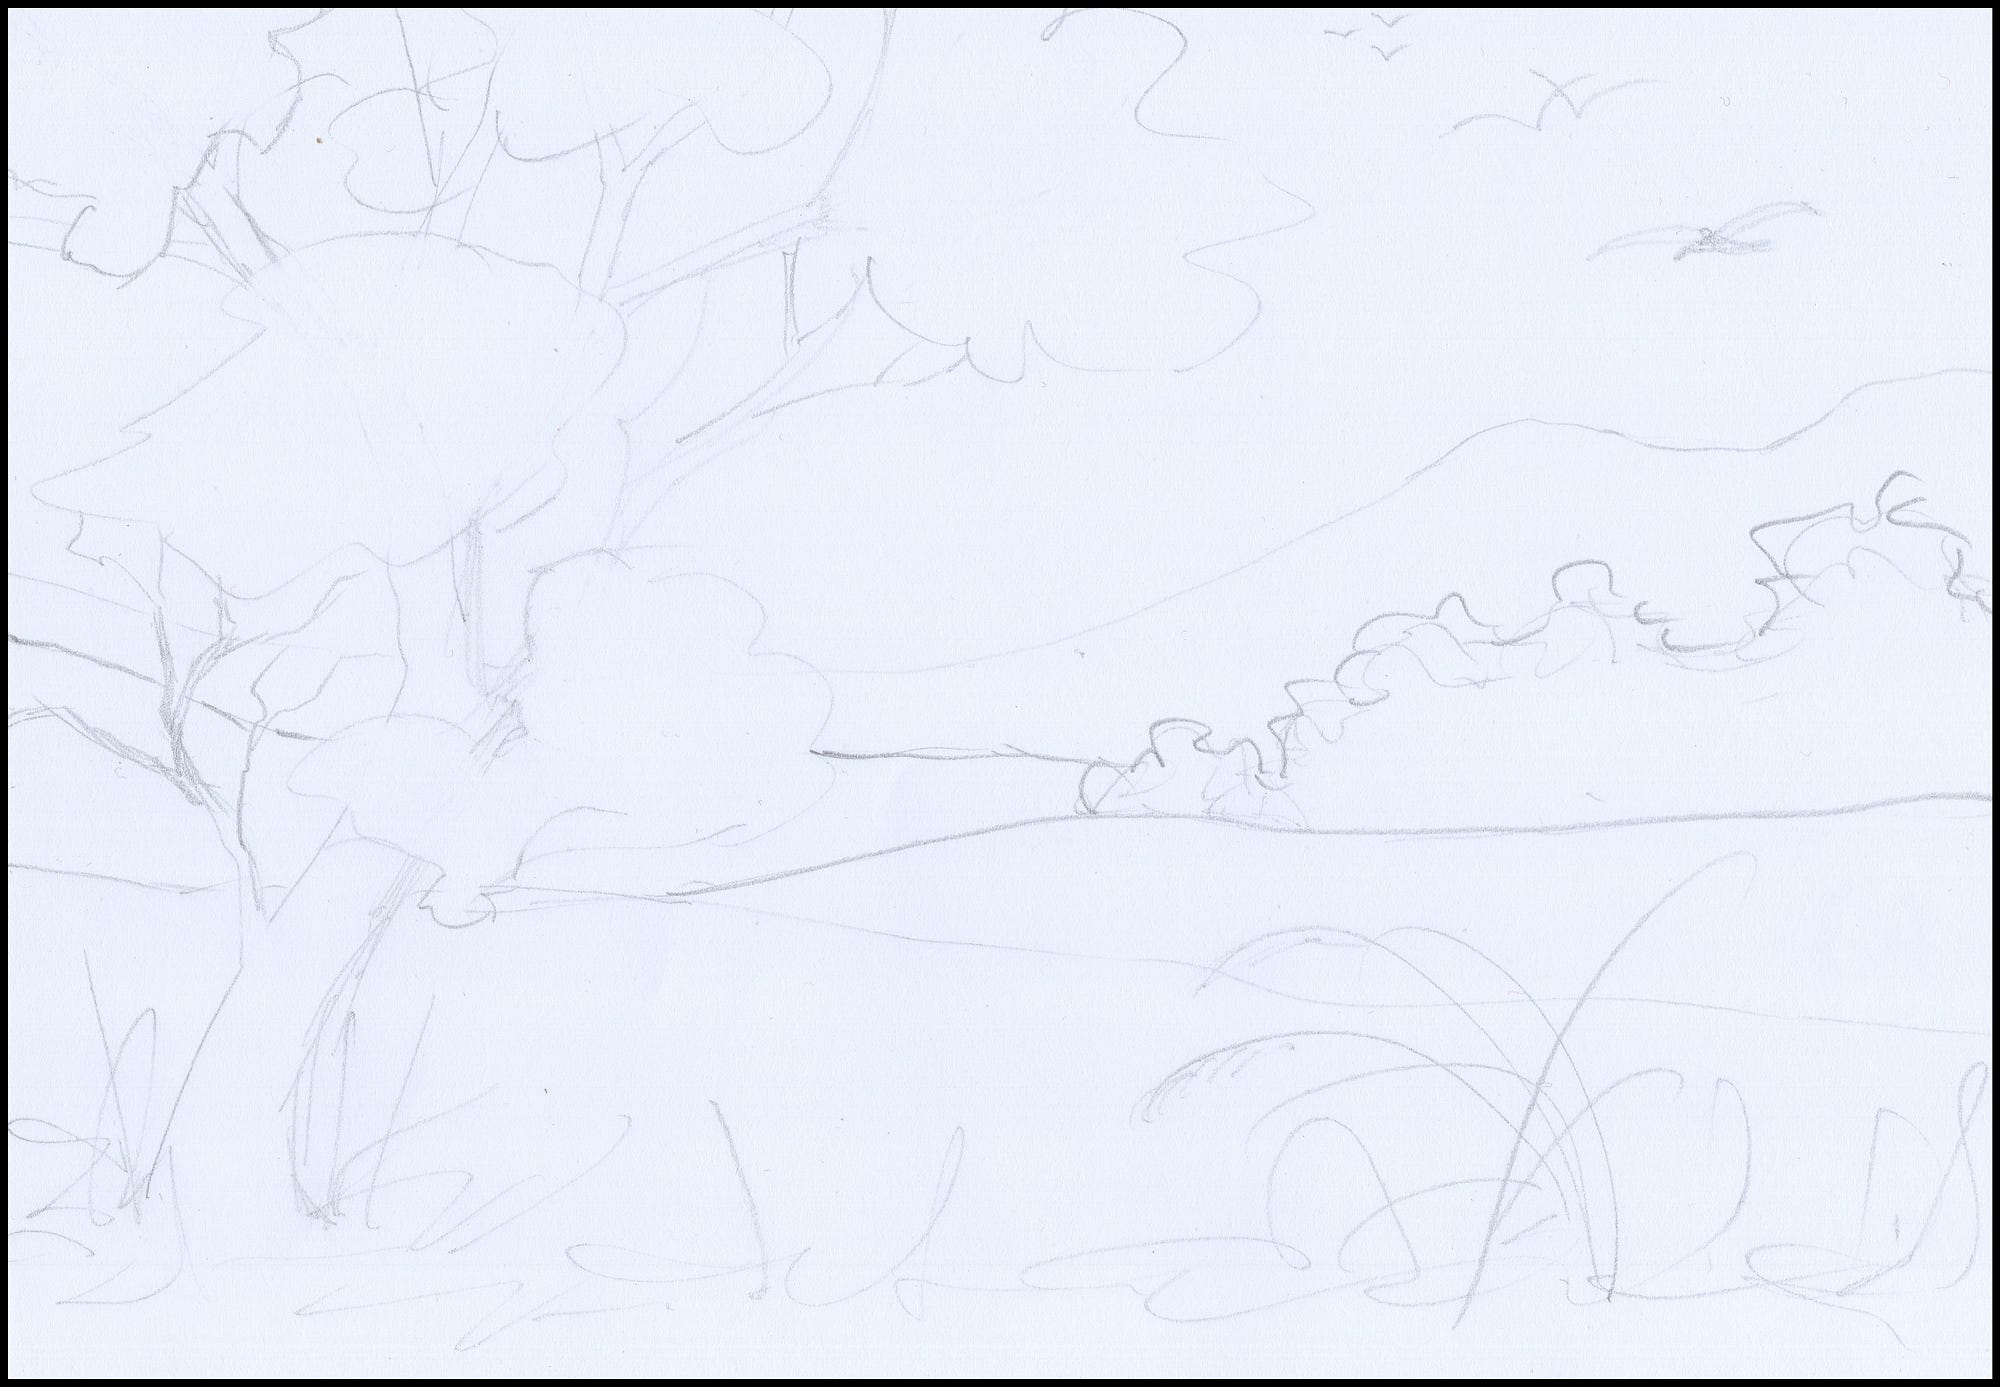
Sketching The Outline
Start by drawing the main shapes of your landscape. Use light lines to mark roads, buildings, and open spaces.
Keep the proportions correct to show the true size of each element from above.
- Draw simple shapes for trees and bushes
- Mark paths and water with smooth lines
- Check distances between objects
Drawing Key Landscape Elements
Drawing a bird’s eye view of a landscape means showing it from above. You need to include important features clearly. This guide helps you draw key parts of the landscape.
Focus on water, terrain, plants, and buildings. Each part has simple shapes that make your drawing easy to understand.
Water Bodies And Terrain
Water bodies like lakes and rivers look like smooth shapes from above. Terrain includes hills, valleys, and flat areas. Use light and dark shading to show height and depth.
- Draw rivers as winding lines that get thinner upstream.
- Show lakes as irregular ovals or circles with smooth edges.
- Use contour lines or shading for hills and valleys.
- Mark flat areas with less shading and simple textures.
Vegetation And Trees
Trees and plants look like small circles or blobs from above. Group them to show forests or gardens. Different plants have unique shapes you can simplify.
| Vegetation Type | Bird’s Eye View Shape |
| Individual Trees | Small circles or ovals |
| Forest | Cluster of overlapping circles |
| Bushes | Irregular rounded shapes |
| Grass Areas | Textured patches or light shading |
Buildings And Structures
Buildings look like rectangles or squares from above. Roof shapes and sizes vary. Add simple details to show doors, windows, and chimneys.
Use this list to add details to buildings:
- Draw rooftops as rectangles or polygons.
- Show shadows on one side for depth.
- Mark entrances with small rectangles.
- Include paths or driveways near structures.
Adding Depth And Details
Drawing a bird’s eye view of a landscape can look flat without depth. Adding details and depth makes the drawing more interesting and clear.
Use shading and textures to create layers and show different surfaces. These techniques help viewers understand the landscape better.
Shading Techniques
Shading adds light and shadow to your landscape. It shows which parts are higher or lower and where the light hits.
Use soft shading for smooth hills and darker shading for deep valleys. Shade areas farther away lighter to show distance.
- Use cross-hatching for rough terrain.
- Blend pencil strokes for smooth surfaces.
- Leave some areas white for highlights.
- Use darker tones for shadows under trees or buildings.
Texture And Patterns
Textures show what the ground or objects are made of. Patterns can represent grass, water, or rocks in the landscape.
Use small repeated shapes to create texture. Different patterns help separate parts of your drawing and add detail.
- Draw short lines for grass or bushes.
- Use wavy lines to show water.
- Use dots or small shapes for gravel or sand.
- Draw tree canopies with rounded shapes or clusters.

Credit: www.freepik.com
Coloring Your Drawing
Adding color to your bird’s eye view landscape brings it to life. Choose colors carefully to show depth and detail. The right colors make your drawing look real and vibrant.
Learn simple ways to blend colors and layer them for smooth effects. These techniques help your drawing stand out with rich textures and natural tones.
Color Choices For Realism
Select colors that match the real landscape. Use shades of green for trees and grass. Browns and grays work well for paths and buildings. Blue is perfect for water and sky.
- Use darker greens for shaded areas.
- Pick lighter greens for sunlit parts.
- Include yellows or oranges for fall leaves.
- Choose muted colors for distant objects.
- Add small touches of bright colors for flowers or signs.
Blending And Layering
Blending colors softly creates smooth transitions. Layering adds depth by building up color slowly. Use these methods to show light, shadow, and texture.
| Technique | How to Use | Effect |
| Blending | Mix two colors gently while wet | Smooth color changes |
| Layering | Apply one color over another after drying | Rich, deep tones |
| Feathering | Use light strokes to soften edges | Natural look |
| Burnishing | Press hard with a light color pencil | Glossy finish |
Final Touches And Enhancements
After sketching the bird’s eye view of your landscape, it is time to add final touches. These details bring life and clarity to your drawing.
Small changes can improve the overall look and make the drawing more accurate.
Highlighting Features
Use shading and color to highlight important parts of your landscape. This helps viewers see the main features clearly.
- Darken areas under trees or buildings to show shadows
- Use lighter colors for open spaces like fields or water
- Add texture to surfaces, such as dots for gravel or lines for grass
- Outline roads and paths with a slightly darker line for emphasis
- Mark bodies of water with blue or wavy lines to suggest movement
Correcting Proportions
Check that all objects in your drawing have the right size compared to each other. Proportion errors can confuse viewers.
| Feature | Common Proportion Issue | Correction Tip |
| Buildings | Too tall or wide | Measure with a scale ruler and adjust height and width |
| Trees | Uniform size regardless of distance | Draw smaller trees farther away for depth |
| Roads | Uneven width | Keep a consistent width based on scale |
| Water bodies | Shapes too irregular | Simplify shapes to smooth curves |
Tips For Practice And Improvement
Drawing a bird’s eye view of a landscape takes time and patience. Practice helps you see shapes and details from above.
Try different ways to improve your skills. Use simple steps to get better with each drawing.
Regular Sketching Habits
Sketch every day to build your drawing skills. Short, daily practice is better than long, rare sessions.
Focus on different parts of the landscape each time. Practice drawing trees, roads, buildings, and water from above.
- Carry a small sketchbook for quick drawings
- Set a timer for 10-15 minutes per sketch
- Try drawing landscapes from photos or memory
- Use simple shapes to outline large areas first
- Review old sketches to see your progress
Analyzing Real Landscapes
Look closely at real places to understand how they appear from above. Notice the shapes and patterns in nature and buildings.
Use parks, streets, or your backyard to study how parts of the landscape fit together. This helps you draw with more detail and accuracy.
- Observe the size and shape of trees and bushes
- Notice roads, paths, and their directions
- See how buildings and open spaces relate
- Watch how water bodies look from above
- Take photos from high places for later study
Credit: medium.com
Frequently Asked Questions
What Is A Bird’s Eye View In Landscape Drawing?
A bird’s eye view shows a landscape from above, like a flying bird’s perspective. It reveals layout and spatial relationships clearly.
How Do I Start Drawing A Bird’s Eye View?
Begin by sketching a simple outline of the landscape’s main features. Use light lines to map roads, trees, and buildings.
What Tools Help Create Detailed Bird’s Eye Views?
Use pencils, rulers, and graph paper for accuracy. Digital tools like drawing tablets also enhance precision and detail.
How Can I Add Depth To A Bird’s Eye View?
Add shadows and varying line thickness. Use color gradients to indicate elevation and distance for a realistic effect.
Conclusion
Drawing a bird’s eye view of a landscape is rewarding. It gives a fresh perspective. Start with basic shapes. Add details like trees and rivers. Use light strokes for sketching. Experiment with colors to bring life. Practice regularly to improve skills.
Enjoy the process and relax your mind. Share your art with friends. Inspire others with your unique creations. Remember, every artist was once a beginner. Keep drawing and exploring new ideas. Your art will get better over time. Celebrate your progress and creativity.
Dive into the world of landscape drawing today!


