
Have you ever wanted to welcome beautiful bluebirds right to your backyard? Building a bluebird house is a simple and rewarding way to do just that.
Imagine watching these bright, cheerful birds nest and raise their young just steps from your window. In this guide, you’ll discover easy steps to create a safe and inviting home for bluebirds. Whether you’re a beginner or just looking for a fun project, this will help you bring nature closer and add a touch of magic to your outdoor space.
Ready to start? Let’s dive in!

Credit: www.bluebirdlanding.com
Choosing The Right Materials
Choosing the right materials is crucial when building a bluebird house. The materials determine not only the durability of the house but also how welcoming it is for the birds. Selecting the proper wood and tools will make your project easier and ensure the bluebirds have a safe, comfortable home.
Best Wood Types
Wood choice affects the house’s lifespan and insulation. Cedar is a top pick because it resists rot and insects naturally. Pine is another option, but it needs to be untreated to avoid harming the birds.
Avoid pressure-treated wood or plywood, as they may release harmful chemicals. Look for wood that is at least 3/4 inch thick to provide good insulation against heat and cold. Have you ever noticed how some woods feel warmer or cooler to the touch? That difference matters to bluebirds too.
Essential Tools
Having the right tools will save you time and frustration. Basic tools include a handsaw or jigsaw, drill, hammer, and screwdriver. A tape measure and pencil will help you make precise cuts and markings.
If you want smoother edges, sandpaper or a power sander can make a big difference. Using a clamp to hold pieces steady while you work can improve accuracy and safety. What tools do you already have that could make this project easier?
Safety Tips
Working with wood and tools requires attention to safety. Always wear safety glasses to protect your eyes from sawdust and debris. Gloves can protect your hands from splinters and sharp edges.
Work in a well-ventilated area, especially if you use any finishes or paints later. Keep your workspace organized to avoid accidents, and never rush through cuts or drilling. How do you make sure you stay safe during DIY projects?
Designing Your Bluebird House
Designing your bluebird house is more than just picking a nice-looking box. Every detail matters to make it a safe and inviting home for these beautiful birds. Your goal is to create a space that fits their size, protects them from predators, and keeps them comfortable throughout the seasons.
Ideal Dimensions
Bluebirds need just the right amount of space inside their house. The floor should be about 5 inches by 5 inches to give them enough room to build a nest and raise their chicks comfortably.
The height of the house should be around 8 to 12 inches. This size helps keep the birds warm and safe without feeling too cramped. You don’t want the house too big, or it might not feel secure to the birds.
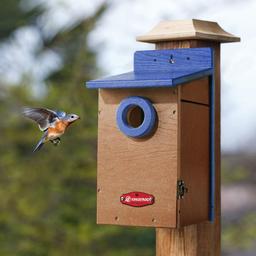
Entrance Hole Size
The entrance hole controls who can get inside. For bluebirds, a hole about 1.5 inches in diameter works best. This size lets bluebirds in but keeps out larger birds and predators.
If the hole is too big, unwanted visitors might take over. Too small, and the bluebirds might not be able to enter easily. Think of it like a door perfectly sized for your guest.
Ventilation And Drainage
Good airflow is essential to keep the nest dry and cool. Add small ventilation holes near the top of the house to let hot air escape. This helps prevent overheating on warm days.
Drainage holes at the bottom stop water from pooling inside after rain. Even a few tiny holes make a huge difference. Without drainage, the nest could get soggy and uncomfortable for the birds.
Cutting And Preparing Wood
Cutting and preparing wood is an important step when building a bluebird house. It shapes the pieces that will form the house. Accurate cutting ensures the house fits together tightly. Proper preparation also makes the wood safe and smooth for the birds. Take your time and work carefully. This will help create a strong and attractive home for bluebirds.
Measuring And Marking
Start by measuring the wood pieces with a tape measure. Mark the wood clearly using a pencil or chalk. Mark lines where you will cut. Double-check each measurement for accuracy. Use a square tool to make straight lines. Clear marks guide your cuts and reduce mistakes.
Cutting Techniques
Use a saw that fits your skill level and tools. A handsaw or jigsaw works well for small wood pieces. Cut slowly along the marked lines. Keep the saw steady to avoid uneven edges. Use clamps to hold the wood in place. This keeps the wood from moving while you cut.
Sanding Edges
Sand the cut edges to remove splinters and rough spots. Use medium-grit sandpaper first, then fine-grit for smoothness. Sand in the direction of the wood grain. Smooth edges protect birds from injury. Clean the wood dust after sanding to keep surfaces clean.
Credit: www.kingsyard.com
Assembling The House
Begin by preparing all wooden parts and tools needed for the birdhouse. Carefully join the pieces, ensuring tight fits and stable walls. Secure each section with nails or screws for a strong, safe home for blue birds.
Assembling the House Building a bluebird house is more than a simple DIY project; it’s a way to invite nature into your backyard. With your pieces cut and ready, it’s time to assemble them into a cozy haven for your feathered friends. This stage requires precision and patience. But don’t worry—it’s also the most rewarding part of the process. Imagine the thrill of seeing a bluebird family nesting in a house you crafted with your own hands!Nailing And Screwing Parts
Start by laying out all the pieces in front of you. This ensures you have everything needed and can visualize the final product. Use nails or screws to attach the sides to the base. A screwdriver or hammer is your best friend here. Make sure the edges align perfectly. If you see gaps, adjust before securing. This ensures a sturdy structure that won’t be easily swayed by weather conditions.Adding The Roof
The roof is crucial to protect the inhabitants from rain and predators. Secure it at a slight angle to allow water to run off easily. Consider adding a small overhang to provide extra shade. Use screws for this part to ensure a tight fit. This keeps the roof intact during strong winds and storms.Installing The Entrance
The entrance hole size is vital for attracting bluebirds while keeping larger birds out. Typically, a 1.5-inch diameter works well. Carefully cut the entrance on the front panel. Sand the edges to prevent splinters, which can harm the birds. Position this panel securely, ensuring the hole is at the correct height. A well-placed entrance invites bluebirds to move in quickly, turning your backyard into a lively sanctuary. Have you considered what kind of location will best suit this new home? Placing the house in the right spot is as important as the build itself, ensuring it’s safe and appealing to bluebirds.Finishing Touches
Adding the finishing touches to your bluebird house can make all the difference between a simple box and a welcoming home. These final steps not only protect the house but also create an environment where bluebirds feel safe and comfortable. Let’s look at how you can perfect your project with painting, mounting, and predator protection.
Painting And Sealing
Choose non-toxic, water-based paints in light colors like white or pale blue to keep the house cool during warm months. Avoid painting the inside or the entrance hole, as bluebirds prefer natural wood surfaces there.
Seal the exterior with a clear, bird-safe sealant to protect against rain and harsh weather. This helps your birdhouse last longer without harming the birds. Have you noticed how a well-painted house stands out yet blends into nature at the same time?
Mounting Options
Mount your bluebird house on a sturdy metal pole or a wooden post, about 4 to 6 feet above the ground. Avoid trees since they provide easy access for predators.
Use a pole with a smooth surface to prevent squirrels from climbing up. If you prefer attaching it to a fence or building, make sure it’s secure and stable. What kind of spot in your yard gets morning sun and afternoon shade? That’s often the best place for your house.
Predator Protection
Protecting your bluebird house from predators is crucial to keep the birds safe. Install a metal baffle on the pole below the house to stop raccoons and snakes from climbing up.
Consider adding a predator guard around the entrance hole made from metal or sturdy plastic. Keep the area around the house clear of dense shrubs and branches that predators could use to jump onto the house. Have you checked your setup from a predator’s perspective?

Credit: www.amazon.com
Placing The Bluebird House
Placing the bluebird house correctly is key for attracting these beautiful birds. A good location ensures safety and comfort. It also helps bluebirds find the house easily and use it for nesting.
Choosing The Location
Select a quiet area with open spaces nearby. Bluebirds prefer fields, meadows, or large lawns. Avoid places with heavy foot traffic or loud noises. Look for spots with few trees or shrubs close to the house. This gives bluebirds a clear flight path.
Proper Height And Orientation
Mount the house 4 to 6 feet above the ground. This height keeps the house safe from predators. Face the entrance hole east or southeast. This direction protects the house from strong winds and harsh weather. Make sure the entrance is clear and not blocked by branches.
Maintenance Tips
Clean the house once a year, ideally in late fall. Remove old nests and debris to prevent pests. Check for damage or wear and fix it quickly. Replace the house if it becomes too worn or unsafe. Regular care keeps the bluebird house inviting and secure.
Frequently Asked Questions
What Materials Do I Need To Build A Bluebird House?
You need untreated wood, screws, nails, and waterproof paint. Avoid using metal or plastic. Use cedar or pine for durability and safety.
How High Should A Bluebird House Be Mounted?
Mount the house 4 to 6 feet above the ground. Place it on a pole or tree. Ensure it is safe from predators.
What Size Entrance Hole Is Best For Bluebirds?
Use a 1. 5-inch diameter entrance hole. This size allows bluebirds in but keeps larger birds out. It helps protect bluebird nests.
When Is The Best Time To Put Up A Bluebird House?
Install the house in early spring before bluebirds start nesting. This timing attracts them and provides shelter during breeding season.
Conclusion
Building a bluebird house brings nature closer to home. It offers a safe space for birds to nest. Use simple materials and follow clear steps. Place the house in a quiet, sunny spot. Regular cleaning helps keep birds healthy and happy.
Watching bluebirds raise their young feels rewarding. Enjoy the beauty and sounds of these lovely birds. Start building today and invite bluebirds to stay.


