
Have you ever wanted to see your favorite places from high above, as if you were flying like a bird? Getting a bird’s eye view in Google Earth lets you explore cities, landmarks, and landscapes from a fresh, exciting perspective.
It’s easier than you think, and once you know how, you’ll feel like you’re soaring over the world right from your screen. Keep reading, and you’ll discover simple steps to unlock this amazing feature and transform the way you explore maps forever.
Getting Started With Google Earth
Google Earth lets you explore the world from your screen. You can see cities, mountains, and oceans from above.
One cool feature is the bird eye view. It shows detailed aerial images at an angle, giving a close look at places.
Installing And Launching The App
First, download Google Earth on your device. It is available for Windows, Mac, Android, and iOS.
- Go to the official Google Earth website or app store.
- Click the download or install button.
- Open the app once installation finishes.
- Sign in with your Google account if needed.
Navigating The Interface
The Google Earth interface has easy tools for exploring maps and images. You will find a search bar, zoom controls, and layers.
| Interface Part | Function |
|---|---|
| Search Bar | Type place names to jump to locations |
| Zoom Controls | Zoom in or out on the map view |
| Layers Panel | Choose what details to show, like roads or borders |
| Navigation Controls | Move the view left, right, up, or down |
Accessing Bird Eye View
Bird Eye View in Google Earth lets you see places from an angled, top-down perspective. This view gives more detail than the standard map view.
You can access this view by using zoom, tilt, and rotate controls. These tools help you explore locations in 3D.
Zooming Techniques
Zooming changes how close or far the view is from the ground. Use the zoom to focus on specific areas.
- Scroll your mouse wheel up to zoom in closer.
- Scroll down to zoom out and see a wider area.
- Use the plus (+) and minus (-) buttons on the screen for zoom control.
- Double-click on a location to zoom in quickly.
Using Tilt And Rotate Features
Tilt changes the angle of the view, showing more of the sides of buildings and terrain. Rotate turns the view around so you can see different directions.
| Feature | How to Use | Effect |
|---|---|---|
| Tilt | Hold Shift and drag the mouse up or down | Changes the viewing angle for a 3D look |
| Rotate | Hold Ctrl and drag the mouse left or right | Rotates the map to see different directions |
Enhancing Bird Eye View Experience
Bird Eye View in Google Earth offers a unique way to see places from above. It helps you understand the layout and details of an area clearly.
To get the most from this view, you can adjust angles and explore 3D features. These tips will improve your experience.
Adjusting Viewing Angles
Changing the viewing angle helps you see places better. You can tilt and rotate the view to get the best perspective.
- Use the mouse wheel to zoom in and out.
- Click and drag to move the map in any direction.
- Hold the Shift key and drag to tilt the view up or down.
- Use the compass icon to rotate the map left or right.
Exploring 3d Buildings And Terrain
Google Earth shows many buildings and landscapes in 3D. This makes the bird eye view more detailed and realistic.
| Feature | Benefit |
| 3D Buildings | See shapes and heights of structures clearly. |
| 3D Terrain | View hills, valleys, and mountains with depth. |
| Street View Integration | Move from bird eye view to street level easily. |
Credit: osintteam.blog
Saving And Sharing Views
Google Earth lets you save bird eye views for later use. You can also share these views with others easily. Saving and sharing helps you keep important locations and show them to friends or colleagues.
This guide explains how to create placemarks, export images, and save tours in Google Earth.
Creating Placemarks
Placemarks mark specific spots on the map. They help you save a bird eye view with a name and description. You can return to these spots anytime.
To create a placemark, click the “Add Placemark” button. Move the pin to the exact location you want. Then, give it a name and save.
- Open Google Earth and go to your bird eye view.
- Click the “Add Placemark” icon in the toolbar.
- Drag the placemark to the right spot on the map.
- Enter a name and description for the placemark.
- Click “OK” to save it.
Exporting Images And Tours
You can export your bird eye views as images or tours. Images are pictures you can save on your computer. Tours are recorded paths you can play back later.
To export images, use the screenshot or save image option. For tours, record your movements and save the file to share.
- For images: Click “File” then “Save” or use the screenshot tool.
- Choose image quality and file format before saving.
- For tours: Click “Record a Tour” and move around your bird eye view.
- Stop recording and save the tour with a name.
- You can share the saved image or tour file with others.
Tips For Better Bird Eye Views
Bird eye view in Google Earth gives a unique perspective of locations. It helps to see the layout and details from above. Using some tips can improve the quality of these views.
This guide covers ways to get clearer and more useful bird eye views. Focus on internet speed, historical images, and using layers.
Optimizing Internet Speed
Google Earth loads many images and map data. A fast and stable internet connection makes the bird eye view smooth and clear. Slow connections may cause images to load poorly or take longer.
- Use a wired connection if possible for better stability
- Close other apps that use internet while viewing
- Clear your browser cache regularly to avoid slowdowns
- Check your internet speed and upgrade if it is below 10 Mbps
- Restart your router to fix connection issues
Using Historical Imagery
Google Earth allows viewing past satellite images. This helps to compare changes over time or find clearer views from different dates. Using this feature can improve the bird eye view experience.
| Benefit | How to Use |
| See changes in landscapes | Select the clock icon to open historical imagery |
| Find clearer images on cloudy days | Pick dates with better weather conditions |
| Compare development over years | Switch between different years easily |
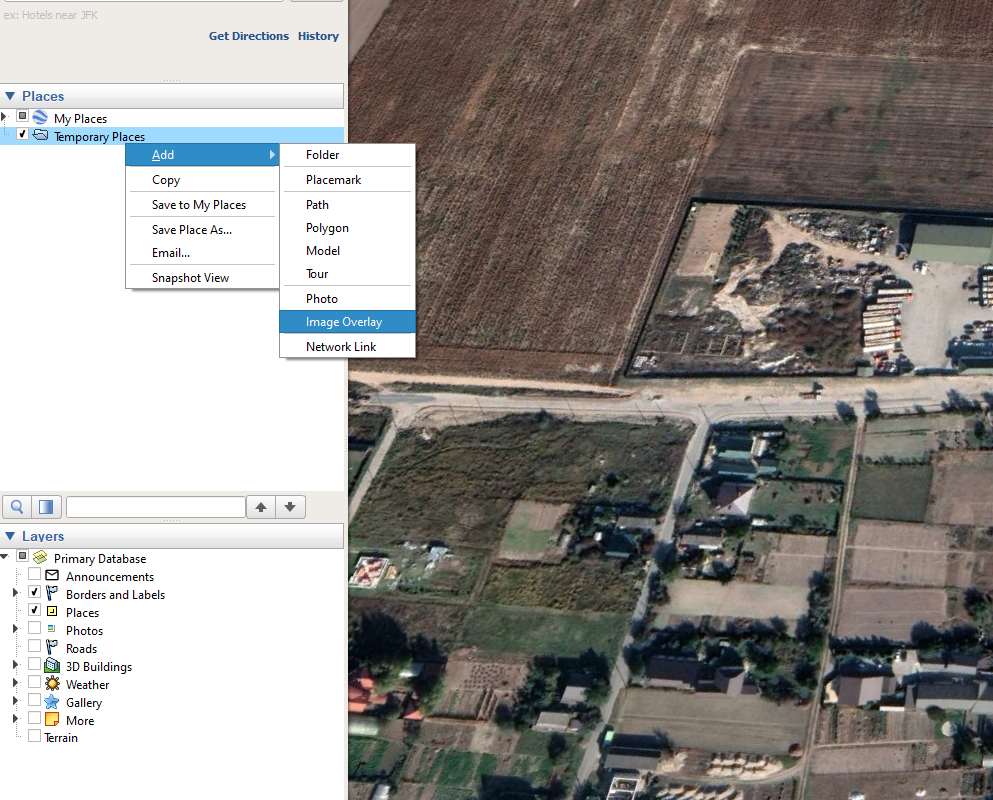
Leveraging Layers And Overlays
Layers add more data on top of bird eye views. You can see roads, borders, or 3D buildings. Overlays let you add custom images or maps. Using these tools improves clarity and context.
- Turn on 3D buildings for better depth perception
- Use the Borders and Labels layer to identify places easily
- Apply Roads layer to see streets and highways clearly
- Upload your own overlays for custom information
- Adjust layer transparency to see the base map
Credit: osintteam.blog
Common Issues And Fixes
Using the bird eye view in Google Earth can sometimes cause problems. These issues can stop the view from loading or show unclear images.
This guide explains common problems and how to fix them. You can enjoy a better experience by following these tips.
Troubleshooting Loading Problems
Bird eye view may not load because of slow internet or browser issues. Clearing cache or updating the app often helps. Sometimes, Google Earth servers face high traffic, causing delays.
- Check your internet speed and try a faster connection.
- Clear your browser cache and cookies.
- Update Google Earth to the latest version.
- Restart the app or your device.
- Try a different browser if using the web version.
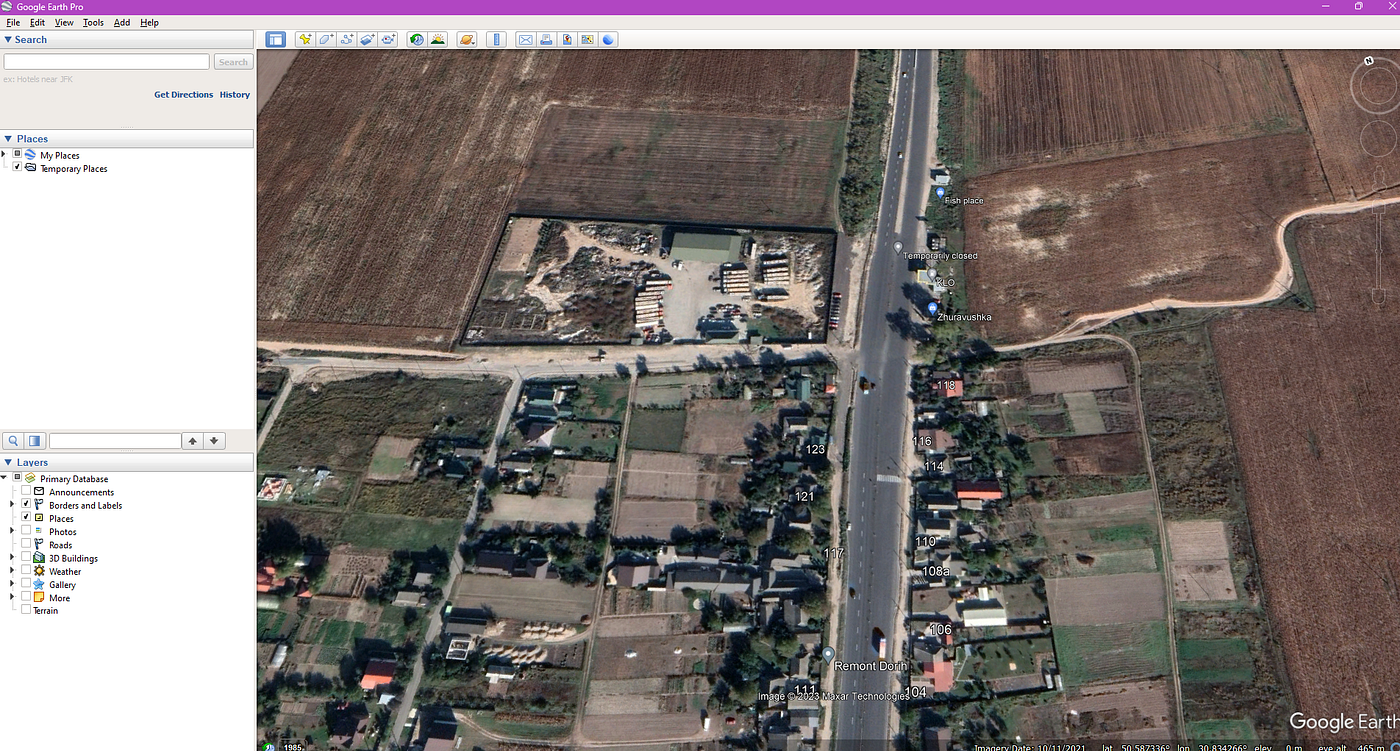
Dealing With Low-resolution Images
Low-resolution images make bird eye view blurry. This happens when Google Earth has limited image data for some areas. Changing the zoom level may improve image clarity.
| Cause | Fix |
| Area has outdated images | Wait for updated maps from Google |
| Zoomed too far in | Zoom out slightly for better clarity |
| Internet speed too slow | Use a faster connection to load higher quality images |
| Cache storing old images | Clear cache to refresh images |

Credit: www.youtube.com
Frequently Asked Questions
What Is Bird’s Eye View In Google Earth?
Bird’s Eye View in Google Earth provides a top-down perspective. It allows users to see landscapes and cities from above. This view offers a unique perspective, showcasing details not visible in standard views. It’s useful for exploring geography, planning trips, or simply enjoying a new perspective.
How Do I Enable Bird’s Eye View?
To enable Bird’s Eye View, open Google Earth and search for a location. Use the zoom slider or mouse scroll to zoom in. Ensure you are in 3D mode by clicking the “3D” button. Adjust the angle to achieve a top-down perspective.
Can I Use Bird’s Eye View On Mobile?
Yes, Bird’s Eye View is available on Google Earth mobile. Download the Google Earth app on your device. Open the app, search for a location, and use two fingers to zoom in. Adjust the angle with gestures to achieve a top-down view.
Does Bird’s Eye View Work Offline?
Bird’s Eye View requires an internet connection to access detailed map data. Google Earth needs to download images and 3D models. For offline use, you can cache certain areas beforehand. However, ensure you have a reliable connection to access the full features of Bird’s Eye View.
Conclusion
Bird Eye View in Google Earth helps you see places from above. This guide showed simple steps to use this feature. You can explore cities, mountains, and oceans easily. Try different angles to find the best view. It makes learning about the world fun and clear.
Keep practicing to get better with the controls. This tool works well for school projects or travel plans. Enjoy the new perspective and discover more every day.


