
Have you ever wanted to see your room from above, like a bird soaring in the sky? Drawing a bird’s eye view of a room lets you do just that.
It’s a simple way to plan your space, rearrange furniture, or even design a new layout. In this guide, you’ll learn easy steps to create your own top-down room sketch, even if you’ve never drawn before. By the end, you’ll have a clear, useful map of your room that makes organizing and decorating much easier.
Ready to get started? Let’s dive in!

Credit: hollyl-84270.medium.com
Materials Needed
Drawing a bird’s eye view of a room shows the layout from above. This helps to plan furniture and space. You need some materials to create a clear and accurate drawing.
Gathering the right tools makes the process easier. Some supplies are essential, while others are optional but helpful.
Essential Tools
Start with basic tools that help you measure and draw straight lines. These tools are needed for accuracy and neatness.
- Graph paper: helps keep lines straight and to scale
- Pencil: allows easy corrections and adjustments
- Eraser: removes mistakes cleanly without damaging paper
- Ruler or straightedge: draws straight lines and measures distances
- Tape measure: measures actual room dimensions
Optional Supplies
These extra materials make your drawing clearer or more professional. They can add color or detail to your plan.
- Colored pencils or markers: highlight different areas or furniture
- Protractor: helps draw angles if needed
- Drafting compass: useful for drawing circles or arcs
- Scale ruler: converts real measurements to smaller, proportional sizes
- Tracing paper: allows you to create overlays or practice

Credit: www.youtube.com
Preparing The Space
Drawing a bird’s eye view of a room starts with good preparation. You need to get the room ready before you begin.
Proper preparation helps you create an accurate and clear drawing. It saves time and avoids mistakes.
Measuring The Room
Measure the room carefully to get the right size for your drawing. Use a tape measure or a laser measure tool.
Write down the length and width of each wall. Also, measure doors, windows, and any fixed furniture.
- Measure walls from corner to corner
- Note door and window sizes and locations
- Record heights if needed for furniture placement
- Check measurements twice for accuracy
Clearing The Area
Clear the room of movable items like chairs, tables, and rugs. This makes it easier to measure and view the space.
Removing clutter helps you see the true shape and size of the room. It also prevents distractions in your drawing.
- Move furniture to another room or corner
- Remove floor rugs and small items
- Keep only fixed objects like built-in shelves
- Clean the floor for better visibility
Sketching The Room Layout
Drawing a bird’s eye view of a room helps you see the whole space clearly. You can plan furniture and movement easily.
Start by sketching the basic layout. Focus on walls, doors, windows, and fixtures to get an accurate plan.
Drawing Walls And Doors
Begin by drawing the outer walls of the room. Use straight lines to show the length and width. Keep the scale consistent.
Next, add the doors. Show the door swings by drawing an arc to indicate how the door opens. This helps in understanding space usage.
- Draw thick lines for walls to show their thickness.
- Mark door locations along the walls.
- Draw arcs to show door swings and opening direction.
- Label doors if needed to avoid confusion.
Marking Windows And Fixtures
Windows let light in and change the room’s look. Draw them as breaks in the wall with thinner lines or double lines.
Fixtures like sinks, toilets, and lights are important to place correctly. Use simple shapes or icons to mark them on the sketch.
| Fixture | Common Symbol |
| Window | Double line break in wall |
| Sink | Small rectangle with faucet shape |
| Toilet | Oval or circle shape |
| Light | Circle with rays |
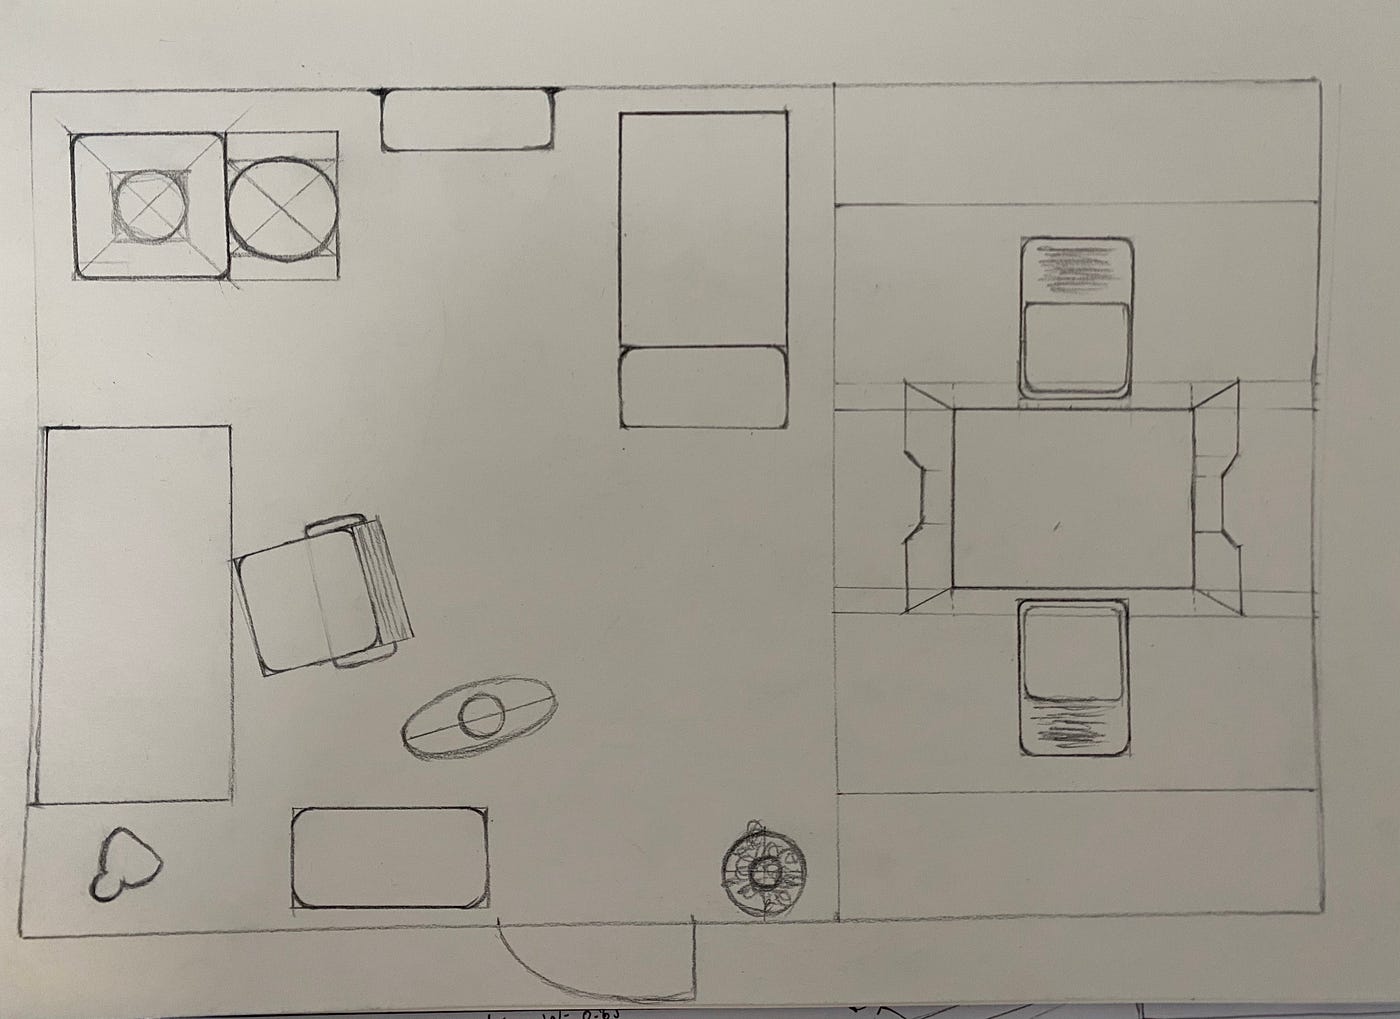
Adding Furniture And Details
Drawing a bird’s eye view of a room helps you plan the space well. Adding furniture and details makes the drawing look complete and useful.
Focus on placing the main furniture first. Then add smaller items to show how the room will be used.
Placing Major Furniture
Start by drawing large pieces like beds, sofas, and tables. Place them where they fit best in the room shape.
- Measure the furniture size carefully before drawing.
- Keep walkways clear for easy movement.
- Group furniture to create cozy areas.
- Use simple shapes like rectangles or circles for each piece.
- Mark doors and windows to avoid blocking them.
Including Small Items
After placing big furniture, add small items to bring life to the room. These include lamps, rugs, plants, and decorations.
| Item | Suggested Size (feet) | Placement Tips |
| Lamp | 1 x 1 | Near chairs or tables for light |
| Rug | 5 x 7 | Under coffee tables or beds |
| Plant | 2 x 2 | In corners or near windows |
| Bookshelf | 3 x 1 | Against walls with easy access |
| Side Table | 2 x 2 | Next to sofas or beds |
Refining The Drawing
Refining your bird’s eye view drawing helps make it clear and neat. This step focuses on making lines and shapes look better.
Adding textures and patterns gives the drawing more detail and depth. It helps viewers understand the materials and surfaces.
Enhancing Lines And Shapes
Start by tracing the main outlines with a fine pen or darker pencil. This makes the drawing easier to read.
Use straight and curved lines carefully to show walls and furniture edges. Keep lines smooth and consistent.
- Erase extra pencil marks after inking lines
- Make sure shapes match the room’s real proportions
- Use rulers for straight edges and compasses for curves
Adding Textures And Patterns
Add textures to show different materials like wood, carpet, or tiles. Use simple patterns that are easy to draw.
Patterns help separate objects and surfaces. Use dots, lines, or crosshatching for variety.
- Draw parallel lines for wood grain
- Use small dots for carpet areas
- Draw squares or diamonds for tiles
Final Touches
Adding final touches to your bird’s eye view drawing makes it clear and easy to understand. These steps help viewers see details and identify parts of the room quickly.
Focus on labeling important components and using color and shading to give depth and clarity to your drawing.
Labeling Components
Labels show what each item or area in the room is. Use simple words and place labels near the objects. This helps people know what they are looking at without guessing.
- Use clear, readable font or handwriting
- Place labels outside furniture shapes but close enough to connect
- Use arrows or lines to link labels to objects
- Keep labels short and simple
- Include room names, furniture, and special features
Using Color And Shading
Colors and shading add depth and separate different parts of the room. They help make the drawing more interesting and easier to read.
| Technique | Purpose | Example |
| Light shading | Show floor surfaces | Soft grey over empty spaces |
| Bold colors | Highlight furniture or walls | Blue for sofa, brown for wood |
| Gradient shading | Give 3D effect | Darker edges on tables |
| Different colors | Separate zones | Green for kitchen, yellow for living area |
Tips For Accuracy
Drawing a bird’s eye view of a room helps you see the layout from above. Accuracy is key to making the drawing useful. Small mistakes can change the whole look.
Use simple tools and tricks to keep your drawing correct. This guide gives tips to keep your drawing true to size and shape.
Maintaining Proportions
Keep the size of objects in the room in the right ratio to each other. If one wall is twice as long as another, show that clearly. This helps the drawing look real.
Use a scale to measure parts of the room. For example, 1 inch on paper can equal 1 foot in the room. Check your measurements often to avoid mistakes.
- Measure each wall and furniture piece carefully
- Draw light guidelines to check sizes
- Use a ruler or scale for straight lines
- Compare objects to each other for correct size
Using Reference Points
Pick fixed spots in the room to help place other items. Corners, doors, and windows work well. These points help you keep everything in the right place.
Start your drawing from one reference point. Measure distances from this point to other parts. This method keeps the layout balanced and accurate.
- Mark corners and doorways first
- Note where windows are located
- Use these points to draw walls and furniture
- Check distances between points as you draw
Credit: medium.com
Frequently Asked Questions
What Is A Bird’s Eye View Of A Room?
A bird’s eye view of a room is a drawing that shows the layout from above. It helps visualize the space and plan furniture arrangement. This perspective is essential for interior design and architectural planning, providing a clear overview of the room’s structure and layout.
How Do You Start Drawing A Room Layout?
Begin by measuring the room’s dimensions accurately. Use graph paper or a digital tool to sketch a scale outline. Include features like doors and windows. This helps to ensure precision in your bird’s eye view, which is crucial for effective space planning.
What Tools Are Needed For Drawing?
You’ll need a ruler, pencil, and graph paper for precision. Digital tools like CAD software or design apps can also be used. These tools help create accurate and scalable drawings, essential for planning a room’s layout from a bird’s eye perspective.
Why Is A Bird’s Eye View Important?
A bird’s eye view offers a clear overview of a room’s layout. It aids in planning furniture placement and room design. This perspective is crucial for maximizing space efficiency and creating a functional, aesthetically pleasing environment.
Conclusion
Drawing a bird’s eye view of a room helps you see the space clearly. It makes planning furniture and design easier. Start with simple shapes and add details step by step. Use a ruler for straight lines and measure carefully.
Practice often to improve your skills and confidence. Soon, you will create neat and useful room layouts. This skill saves time and helps avoid mistakes. Keep your drawings clear and simple for best results. Enjoy the process and watch your ideas come to life on paper.


