
Have you ever wanted to create drawings that look like you’re soaring high above, seeing everything from a bird’s eye view? Learning how to draw from this unique perspective can make your artwork stand out and bring a fresh, exciting angle to your skills.
In this guide, you’ll discover simple steps to master bird’s eye view perspective, even if you’re a beginner. By the end, you’ll be able to create scenes that feel dynamic and real, capturing attention every time. Ready to transform your drawings and impress others with your new skill?
Let’s dive in!
Credit: chelsealiu-40923.medium.com
Basics Of Bird’s Eye View
Bird’s eye view shows a scene from above. It looks like you are flying over the subject. This view helps to see the layout and shapes clearly.
Artists use this perspective to create interesting and useful drawings. It is common in maps, plans, and some types of art.
What Is Bird’s Eye View Perspective
Bird’s eye view is a type of perspective seen from high above. The viewer looks down at objects below. This angle shows the tops of things more than the sides.
- Objects appear smaller as they get further away.
- Lines that are parallel on the ground may appear to meet in the distance.
- The horizon line is usually high or sometimes not visible.
- It helps show the relationship between objects in space.
Common Uses In Art And Design
Bird’s eye view is popular in many areas of art and design. It helps show layouts and details that are hard to see from other angles.
| Field | Purpose |
| Architecture | To show building plans and site layouts |
| Cartography | To create maps that show roads and landmarks |
| Video Games | To display game worlds and player positions |
| Fine Art | To create dynamic and unusual compositions |
Tools Needed For Drawing
Drawing a bird’s eye view perspective can be fun and creative. You need the right tools to help you create clear and accurate sketches.
Choosing the right supplies will make your drawing process easier and more enjoyable. Let’s look at the basic tools you need.
Essential Drawing Supplies
Start with simple supplies like pencils and paper. Use a ruler to draw straight lines for the perspective.
Good erasers help fix mistakes without damaging the paper. Sharp pencils give you clean lines and details.
- Pencils (HB, 2B, 4B for different shades)
- Drawing paper or sketchbook
- Ruler or straightedge
- Eraser (kneaded or rubber)
- Sharpener
- Compass (for circles and curves)
Digital Vs Traditional Tools
Traditional tools are easy to find and use anytime. Digital tools need a tablet or computer but offer more editing options.
Digital drawing apps have brushes and layers that help you work faster. Traditional drawing feels natural and tactile.
- Traditional:pencils, paper, erasers, rulers
- Digital:drawing tablet, stylus, software (like Procreate or Photoshop)
Setting Up Your Drawing Space
Before drawing birds eye view perspective, prepare your workspace well. A neat space helps you focus and draw better.
Organizing your area makes the drawing process smoother and more enjoyable. Start by choosing a good surface and arranging your tools.
Choosing The Right Surface
Select a flat, stable surface for your drawing. A desk or table works best to keep your paper steady.
Good lighting on the surface is important. Natural light or a bright lamp helps you see details clearly.
- Use a smooth desk or table
- Ensure enough light on your surface
- Avoid places with glare or shadows
- Keep the surface clean from dust
Organizing Materials
Gather all drawing tools before you start. This saves time and keeps you focused on your work.
Arrange pencils, erasers, rulers, and paper in easy reach. Use containers or trays to keep things tidy.
- Have pencils of different hardness ready
- Keep erasers and sharpeners nearby
- Place rulers and compasses within reach
- Use a container to hold small tools
Starting With Simple Shapes
Drawing from a bird’s eye view means looking down on objects. This view shows the tops of shapes. Starting with simple shapes helps you understand this perspective.
Using basic forms like circles, squares, and rectangles makes it easier to build complex drawings. You can add details later after you get the shapes right.
Drawing Basic Forms From Above
Start by drawing common shapes as if you are looking down on them. For example, a cube looks like a square with lines showing its sides. A sphere looks like a circle with shading on top.
- Draw circles for round objects like balls or plates.
- Use squares and rectangles for boxes and tables.
- Sketch triangles for rooftops or cones.
- Practice shading to show light and shadow from above.
Practicing With Everyday Objects
Look at objects around you and try to draw them from above. Focus on their basic shapes first. This practice helps you see how perspective changes the forms.
| Object | Basic Shape | Bird’s Eye View Shape |
| Cup | Cylinder | Oval (top) with sides |
| Book | Rectangle | Rectangle with visible thickness |
| Chair | Square and circles | Square seat, circles for wheels |
| Apple | Sphere | Circle with shading on top |
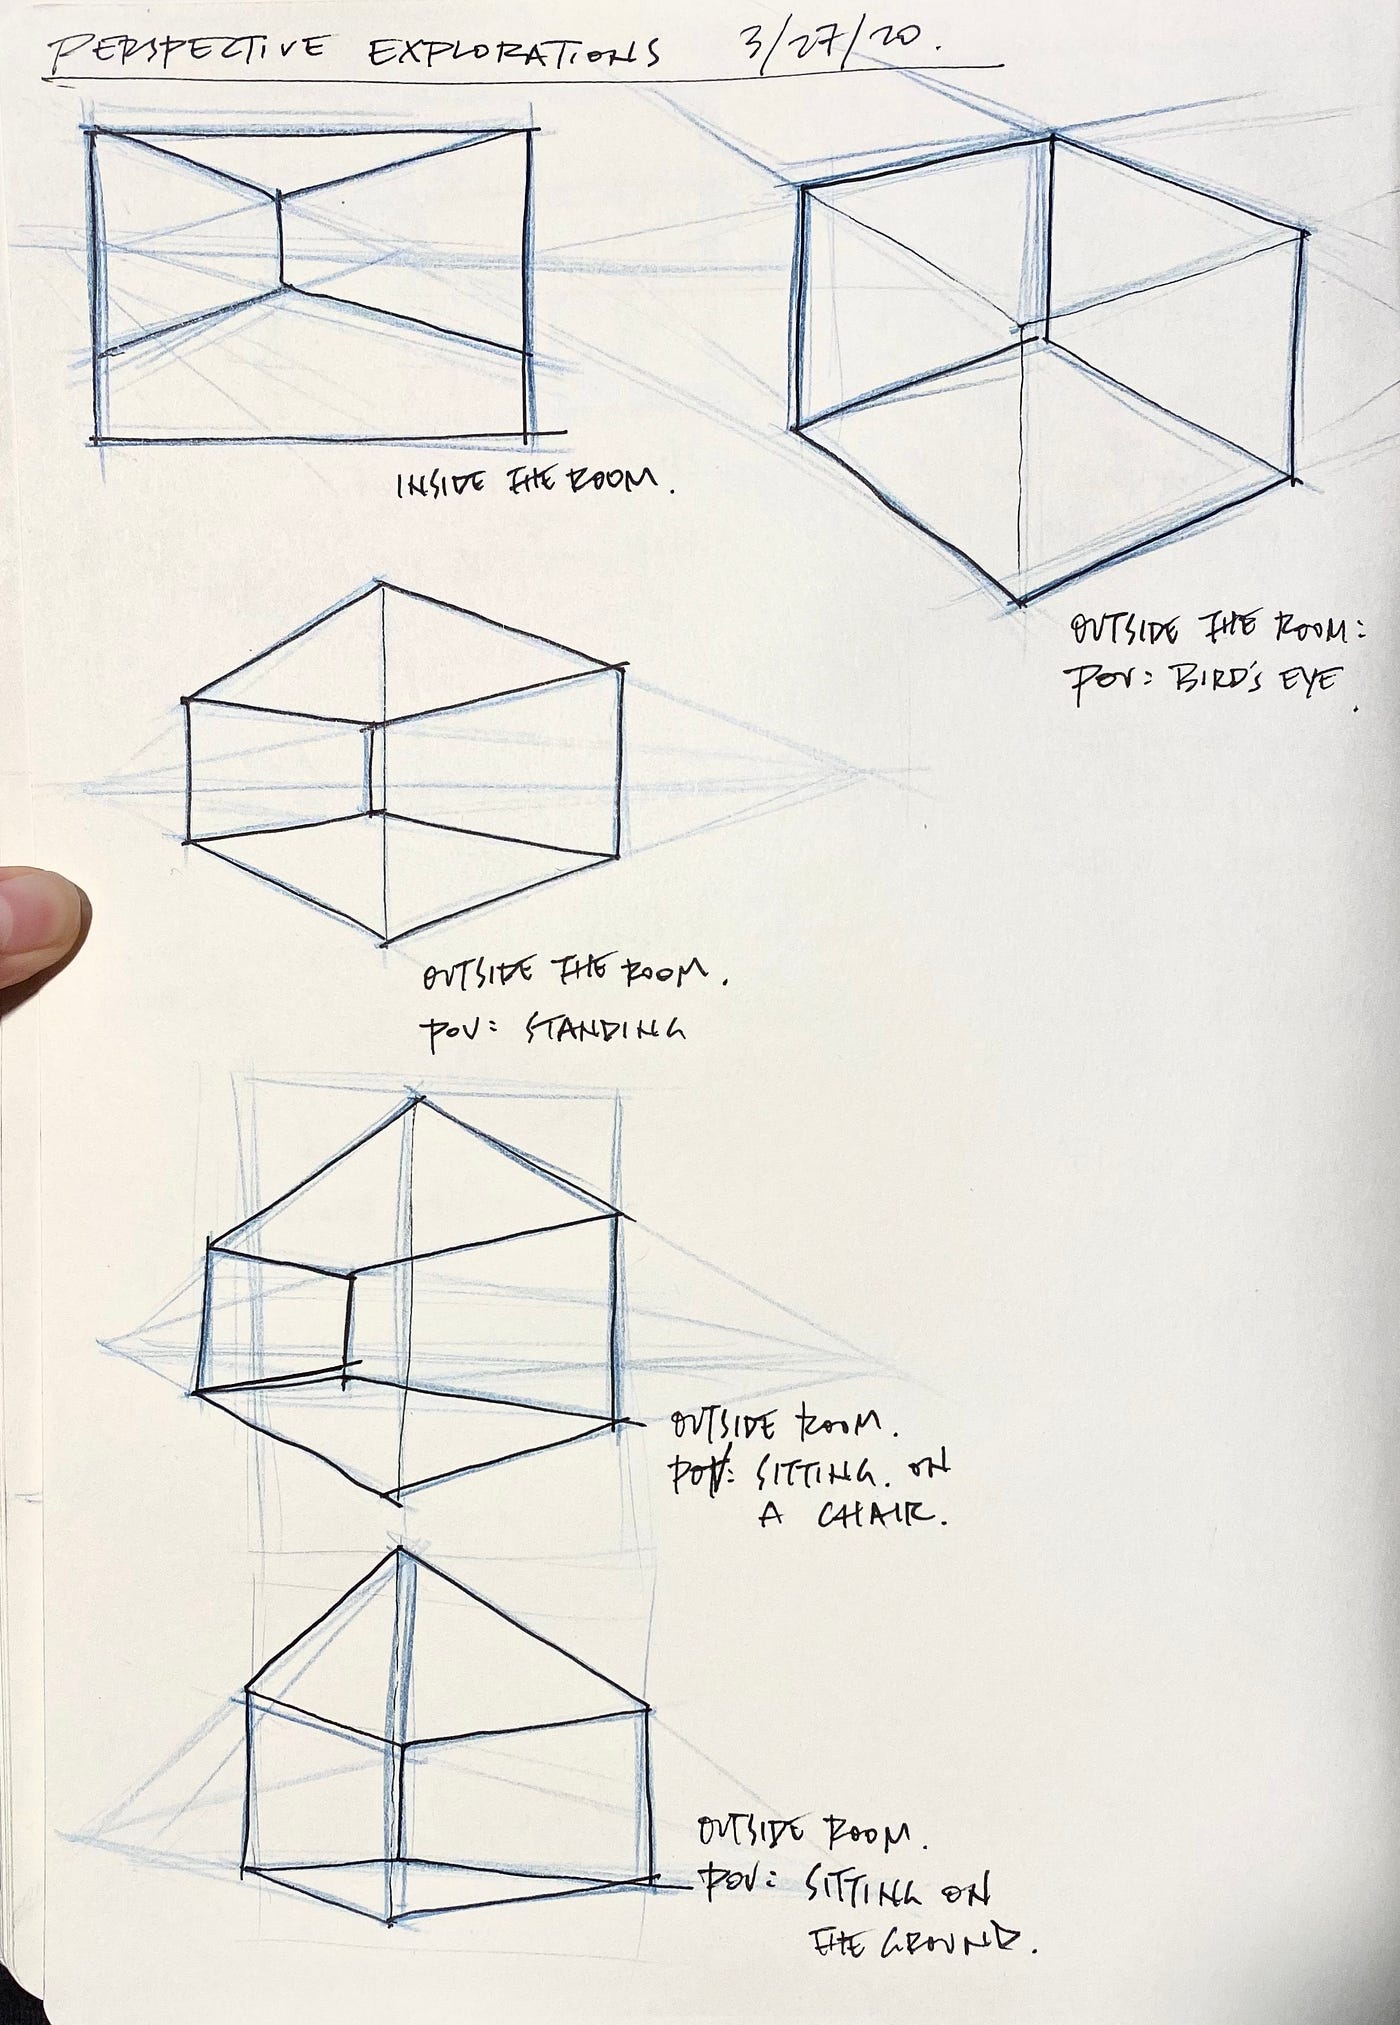
Creating A Horizon Line And Vanishing Points
Drawing a birds eye view perspective helps show objects from above. You need to set a horizon line and vanishing points first. These guides create depth and space in your drawing.
This guide explains how to place the horizon line and find vanishing points. Use these steps to make your birds eye view look accurate.
Placing The Horizon Line
The horizon line represents the eye level in your drawing. It is where the sky meets the ground. In birds eye view, place it high on your paper to show looking down.
- Draw a horizontal line near the top of your paper.
- Keep it straight and even across the page.
- This line sets the viewer’s eye level.
- Objects above the line appear below the viewer.
- Objects below the line appear farther away.
Locating Vanishing Points For Depth
Vanishing points help objects get smaller as they go away. Place these points on the horizon line to show depth. For birds eye view, use two vanishing points for angles.
| Vanishing Point | Purpose | Placement |
|---|---|---|
| Left Vanishing Point | Shows depth on left side | On left edge of horizon line |
| Right Vanishing Point | Shows depth on right side | On right edge of horizon line |
Connect lines from your objects to these points. This technique makes your drawing look three-dimensional and correct in perspective.
Credit: chelsealiu-40923.medium.com
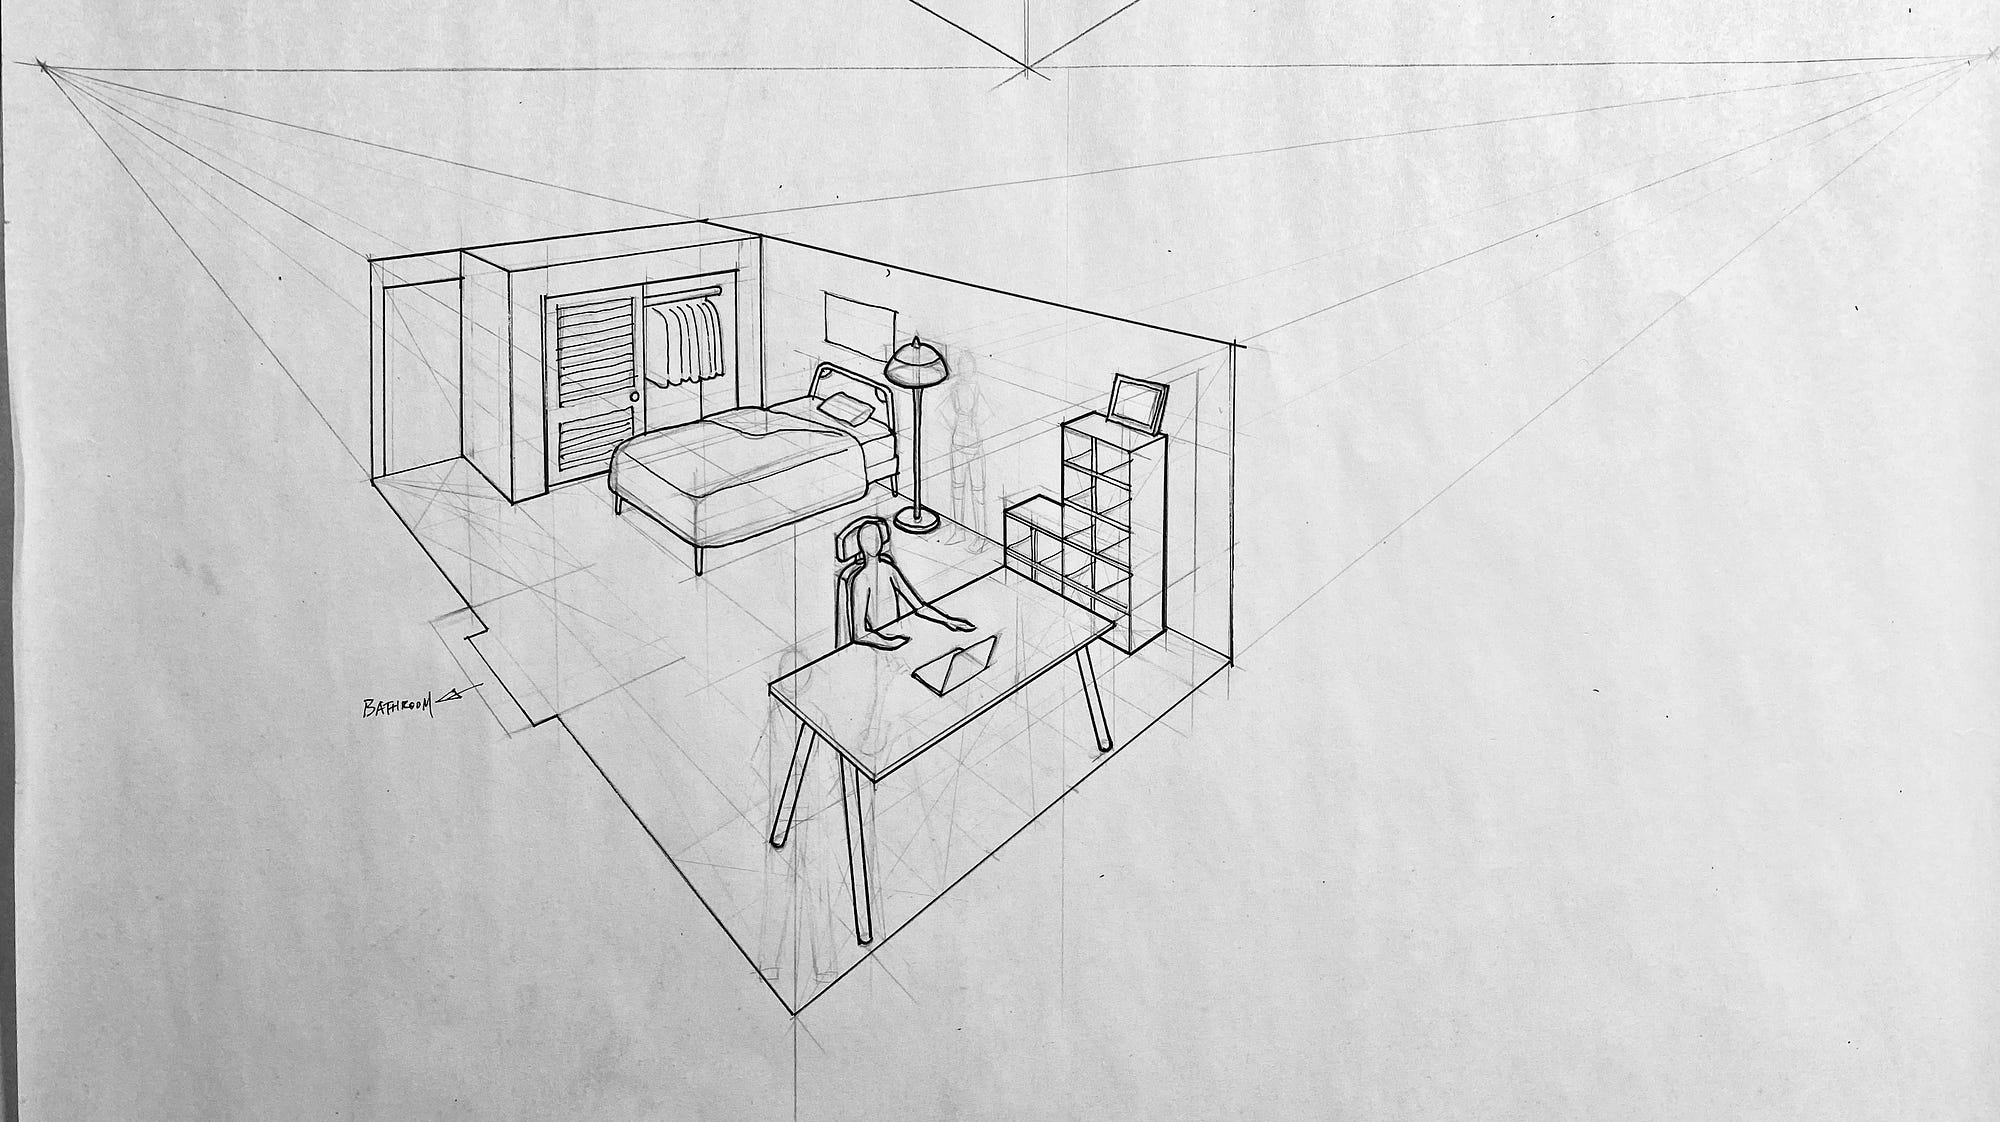
Sketching The Main Elements
Drawing a bird’s eye view means showing a scene from above. It gives a clear look at buildings, roads, and land.
Start by sketching the main shapes. This helps you place everything in the right spot.
Outlining Buildings And Landscape
Begin with simple shapes like squares and rectangles for buildings. Use straight lines to keep them neat.
Draw the landscape around the buildings. Include trees, hills, or water by using soft, curved lines.
- Keep building shapes simple at first
- Draw rooftops as flat or angled shapes
- Mark open spaces for parks or gardens
- Use light lines to adjust details later
Adding Roads And Pathways
Sketch roads as wide lines that connect buildings and areas. Use curves to show natural paths.
Pathways can be narrower lines. Place them in parks or between buildings to guide the eye.
- Draw main roads first, then smaller paths
- Show road intersections clearly
- Use dashed lines for trails or footpaths
- Keep road widths consistent
Adding Details And Textures
Adding details and textures makes a bird’s eye view drawing more interesting. These elements bring life to your perspective.
Focus on small objects and surface patterns to create depth and realism in your work.
Incorporating Trees And Vehicles
Trees and vehicles add scale and context to your bird’s eye view. Place them carefully to avoid clutter.
- Draw trees as simple shapes with textured tops to show leaves.
- Use varied sizes for trees to suggest distance.
- Sketch vehicles as small rectangles or ovals with basic details.
- Add shadows under vehicles to ground them on the surface.
- Group trees and vehicles in clusters for a natural look.
Shading For Realism
Shading helps show light direction and surface shape. It adds volume to your drawing.
| Shading Technique | Effect |
| Hatching | Shows texture and shadows with lines |
| Cross-hatching | Creates deeper shadows and contrast |
| Blending | Smooths shadows for soft surfaces |
| Stippling | Uses dots to build texture and tone |
| Gradient shading | Transitions light to dark for curves |
Common Mistakes To Avoid
Drawing a bird’s eye view perspective can be tricky. Many artists make simple mistakes that ruin the scene’s depth.
Knowing what to avoid helps you create clear and balanced drawings. Here are two common errors to watch out for.
Incorrect Perspective Angles
Bird’s eye view means looking straight down from above. Using wrong angles can confuse the viewer.
Lines and shapes must follow the top-down viewpoint. If angles are off, objects may look flat or distorted.
- Avoid tilting objects too much to the side.
- Keep parallel lines consistent with the overhead view.
- Check that all elements point downward, not sideways.
Overcrowding The Scene
Filling the entire space with too many details makes the drawing hard to read. It can overwhelm the viewer’s eyes.
Leave some empty spaces to balance the composition. This helps important parts stand out clearly.
- Do not add too many small objects close together.
- Focus on main shapes and key details only.
- Use spacing to show depth and separation between objects.
Tips For Improving Your Skills
Drawing birds eye view perspective can be tricky at first. With regular practice, you can get better fast.
Use simple exercises and helpful tools to build your confidence and skill level.
Practice Exercises
Start with basic shapes like squares and circles. Draw them as if you are looking from above. Try adding shadows to add depth. Repeat these exercises often to improve your eye for perspective.
- Draw a room from above, including furniture
- Sketch a city block using simple buildings
- Practice drawing roads and parks seen from the sky
- Use grid paper to keep lines straight
- Try quick sketches to build speed
Using Reference Images
Look at photos or drawings that show a birds eye view. Study how objects shrink and change shape with distance. Use these images as a guide while you draw.
| Type of Reference | Benefits | How to Use |
| Aerial Photos | Real-world details | Trace outlines to learn shapes |
| Maps | Clear layout of areas | Practice drawing streets and blocks |
| 3D Models | View from any angle | Rotate to see perspective changes |
| Sketchbooks | Different styles | Copy and compare techniques |

Credit: www.youtube.com
Exploring Advanced Techniques
Drawing a bird’s eye view perspective shows scenes from above. It helps create dynamic and interesting artwork.
Advanced techniques improve your drawings with depth and realism. These tips will guide you through color, lighting, and animation.
Adding Color And Lighting
Use color to show distance and shape. Lighter colors often appear closer, while darker shades can show shadows.
Lighting adds mood and makes objects stand out. Imagine where the sun or light source is and add highlights and shadows.
- Choose a light source direction before coloring
- Use cooler colors for shadows and warmer colors for highlights
- Apply gradients to show roundness and depth
- Keep colors consistent for a realistic scene
Animating Bird’s Eye View Scenes
Animation brings your bird’s eye view to life. You can show movement like flying birds or flowing water.
Use simple frame changes to show motion. Adjust elements like shadows and light to match the movement.
- Start with a clear storyboard of the scene
- Move objects along smooth paths for natural flow
- Change lighting effects as objects move
- Use layering to create depth in animation
Frequently Asked Questions
What Is A Bird’s Eye View Perspective?
A bird’s eye view perspective shows a scene from above. It’s useful for creating maps and architectural designs. Artists use this technique to depict landscapes, cities, and complex structures. This perspective provides a comprehensive overview, making it invaluable for planning and visualization.
How Do You Draw A Bird’s Eye View?
Start with a horizon line at the top of your paper. Sketch objects below this line, showing their tops. Use vanishing points to guide perspective lines. Adjust angles and sizes to reflect distance and depth. Practice improves accuracy and realism.
Why Is Bird’s Eye View Perspective Important?
Bird’s eye view perspective enhances understanding of spatial relationships. It’s crucial for architects, urban planners, and artists. This perspective helps visualize designs, plan layouts, and create immersive environments. It provides a unique vantage point, revealing details often missed in ground-level views.
What Tools Do I Need For Drawing?
Basic tools include paper, pencil, eraser, and ruler. A compass and protractor aid in creating accurate angles and curves. Graph paper helps maintain proportion and alignment. Digital tools like design software can also enhance precision and creativity.
Conclusion
Drawing bird’s eye view perspective takes practice and patience. Start with simple shapes and build up your skills step by step. Use guidelines to keep your angles right. Notice how objects look smaller as they move away. Try sketching different scenes from above.
Each drawing will help you see better. Keep practicing regularly to improve your view. Soon, your drawings will look more real and clear. Enjoy the process and have fun with your art.


