
Have you ever wanted to capture stunning bird’s eye view photos or videos but felt limited by your gear? Imagine having a simple, affordable tripod that lets you shoot from above with ease.
Making your own bird’s eye view tripod is easier than you think, and it can transform the way you capture moments. In this guide, you’ll discover step-by-step how to build a reliable tripod that fits your needs perfectly. Keep reading to unlock the secret to elevating your photography game and impressing everyone with your unique shots.
Materials Needed
To build a birds eye view tripod, gather all necessary materials first. This helps ensure a smooth assembly process.
Each material plays a key role in the tripod’s stability and function. Choose quality items to get the best results.
Essential Tools
You need several tools to make the tripod. These tools help you cut, join, and secure parts accurately.
- Measuring tape or ruler
- Hand saw or hacksaw
- Screwdriver set
- Drill with drill bits
- Clamps for holding pieces
- Sandpaper or file
- Wrench or pliers
Choosing The Right Tripod Components
Select parts that fit your project size and weight needs. Use materials that are strong yet light.
| Component | Material | Purpose |
| Legs | Aluminum or wood | Support and stability |
| Central column | Metal pipe or sturdy wood | Height adjustment and balance |
| Tripod head | Plastic or metal | Mount for camera or device |
| Screws and bolts | Steel | Secure joints and parts |
| Rubber feet | Rubber or silicone | Prevent slipping and protect surfaces |
Credit: www.kentfaith.com
Designing Your Tripod
Making a birds eye view tripod requires careful design. You must consider height, angle, and stability. These factors help you get clear and steady shots from above.
This guide will focus on selecting the right height and angle and ensuring the tripod stays balanced. Good design makes your tripod safe and easy to use.
Selecting The Height And Angle
Choose a height that fits your shooting needs. Too tall can be unstable. Too short may limit your view. The angle of the tripod head affects your camera’s direction.
- Measure the maximum height you need for shooting.
- Pick adjustable legs to change height easily.
- Set the tripod head to tilt and swivel for flexible angles.
- Use a bubble level to check if your tripod is even.
- Consider the weight of your camera when selecting height.
Ensuring Stability And Balance
Stability keeps your camera steady during shooting. Balance prevents the tripod from tipping over. Both depend on good materials and design.
| Feature | Tip | Reason |
| Leg Material | Use aluminum or wood | Strong and less shaky |
| Leg Spread | Wide spread at base | Better balance |
| Center Column | Keep it low or remove | Lower center of gravity |
| Feet | Add rubber or spikes | Prevent slipping on surfaces |
| Weight Hook | Attach a weight below | Increase stability in wind |
Step-by-step Assembly
Making a birds eye view tripod helps you capture unique photos from above. This guide shows you how to build it easily.
Follow these steps to assemble the tripod correctly. Each part is important for stability and good camera positioning.
Building The Base
Start by creating a strong base to hold the tripod steady. Use a flat board or a sturdy square frame.
Make sure the base is wide enough to support the tripod legs and the camera weight.
- Cut a wooden board about 12 inches square
- Smooth the edges with sandpaper
- Drill holes at three equal points near edges
- Ensure the holes fit your leg attachments
Attaching The Legs
Attach three legs to the base using screws or bolts. The legs should be strong and adjustable if possible.
Position the legs evenly around the base for balance and stability.
- Use wooden dowels or metal rods for legs
- Insert each leg into the drilled holes
- Secure legs tightly with screws or bolts
- Adjust leg angles to keep tripod stable
Mounting The Camera Holder
Fix a camera holder on top of the tripod. It should hold your camera securely facing downward.
Use a swivel mount or a flat plate with a screw to fit your camera.
- Attach a small platform or plate at the tripod center
- Fix a 1/4 inch screw for camera mounting
- Ensure the holder is tight and does not wobble
- Test by placing your camera on the holder

Credit: www.amazon.com
Testing And Adjustments
After building your birds eye view tripod, testing and adjusting it is key. This process makes sure the tripod works well and is safe to use.
Focus on checking the stability first. Then, fine-tune the angle for the best view. Each step helps improve your tripod’s performance.
Checking Stability
Check if the tripod stands steady on flat ground. It should not wobble or tilt. Test it by gently pushing from different sides.
- Place the tripod on a firm surface.
- Push gently on each leg to check for movement.
- Make sure all legs touch the ground evenly.
- Tighten any loose screws or joints.
- Adjust leg lengths if the tripod leans.
Fine-tuning The Angle
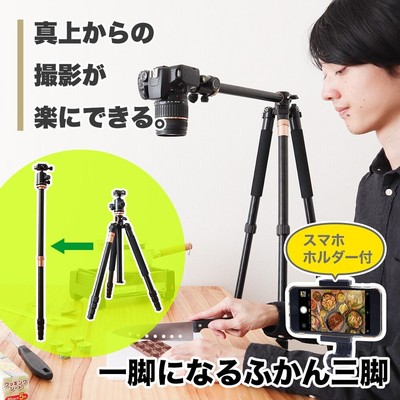
Adjust the angle of the birds eye view arm carefully. The angle affects how much area you can see from above.
| Adjustment | Effect |
| Increase arm angle | Wider view but less height |
| Decrease arm angle | Taller view but narrower area |
| Lock angle firmly | Prevents unwanted movement |
Test different angles and lock the best one in place. Make sure the arm does not move when you use the tripod.
Tips For Stunning Bird’s Eye Shots
Capturing bird’s eye shots can give your photos a fresh and unique look. A well-made tripod helps you get stable and clear images from above.
Below are some useful tips on camera settings and composition ideas to make your bird’s eye shots stand out.
Optimal Camera Settings
Setting your camera correctly is key to sharp and bright bird’s eye photos. Adjust these settings for the best results.
- Aperture:Use a small aperture (f/8 to f/16) for deep focus.
- Shutter Speed:Keep shutter speed fast to avoid blur from movement.
- ISO:Set ISO low (100-200) to reduce noise.
- Focus:Use manual focus or focus lock for accuracy.
- White Balance:Adjust to match lighting conditions for true colors.
Creative Composition Ideas
Good composition makes your bird’s eye photos more interesting. Try different ideas to find what works best.
| Composition Tip | Description |
| Leading Lines | Use roads, paths, or rivers to guide the viewer’s eye. |
| Patterns | Capture repeating shapes or textures from above. |
| Symmetry | Find balanced scenes for a pleasing look. |
| Contrast | Mix light and dark areas to add drama. |
| Framing | Use natural elements like trees or windows to frame the subject. |
Credit: www.ebay.co.uk
Maintenance And Storage
Keeping your birds eye view tripod in good shape helps it last longer. Regular care stops damage and keeps it working well.
Proper storage protects the tripod from dust and moisture. This saves time and money on repairs.
Cleaning Your Tripod
Clean your tripod after every outdoor use. Dirt and dust can block the joints and locks.
Use a soft cloth and mild soap to wipe the legs and head. Avoid harsh chemicals that can damage parts.
- Brush off loose dirt with a soft brush
- Wipe metal parts with a damp cloth
- Dry the tripod fully before storing
- Check for rust and clean it gently
Safe Storage Practices
Store your tripod in a dry place to stop rust and mold. Avoid areas with high humidity or heat.
Keep the tripod folded and secured to prevent damage. Use a tripod bag or case for extra protection.
- Fold the tripod legs carefully
- Lock the legs to keep them in place
- Store in a cool, dry spot
- Use a protective bag or case
Frequently Asked Questions
What Materials Are Needed For A Birds Eye View Tripod?
You need sturdy poles, a tripod head, screws, and a mounting plate. Choose lightweight, durable materials for easy handling and stability.
How Do I Assemble A Birds Eye View Tripod?
Connect the three legs securely at the top. Attach the mounting plate and tripod head. Ensure all joints are tight for stability.
Can I Use A Birds Eye View Tripod For Photography?
Yes, it provides a high vantage point ideal for overhead shots. It enhances perspective and captures unique angles easily.
How To Ensure Stability In A Birds Eye View Tripod?
Use strong materials and secure joints firmly. Position legs wide apart and use weights if needed to prevent tipping.
Conclusion
Building a bird’s eye view tripod is easier than it seems. With some basic tools and materials, you can create a sturdy setup. Follow the steps carefully to ensure stability and safety. This DIY project saves money and enhances your photography skills.
Experiment with angles for unique shots. Share your creations with friends or online communities. Your homemade tripod will serve your photography needs well. Enjoy capturing moments from a new perspective. Happy shooting!


